
![Terraria Server {shmolf}]() Terraria Server {shmolf}
Terraria Server {shmolf}
Container
Docker container for a Terraria dedicated server.
Image details
Source details
Configuration
TypeContainerlinuxpassivelemon/terraria-docker:latest7777:7777/tcp/usr/share/tesseract-ocr/5/tessdata : /portainer/Files/AppData/Libraries/StirlingPDF/tessdataPUID=1000PGID=1000WORLD=dockerworldunless-stoppedTemplate by shmolf
Report issueNotes
Standalone Install
Select an install method, to see config/commands for deploying Terraria Server {shmolf}
Install on Portainer
Import all app templates into your Portainer instance, for easy 1-click deploys
- Ensure both Docker and Portainer are installed, and up-to-date
- Log into your Portainer web UI
- Under Settings → App Templates, paste the below URL
- Head to Home → App Templates, and the list of apps will show up
- Select Terraria Server {shmolf}, fill in any config options, and hit Deploy
Template Import URL
https://raw.githubusercontent.com/Lissy93/portainer-templates/main/templates.json
Show Me
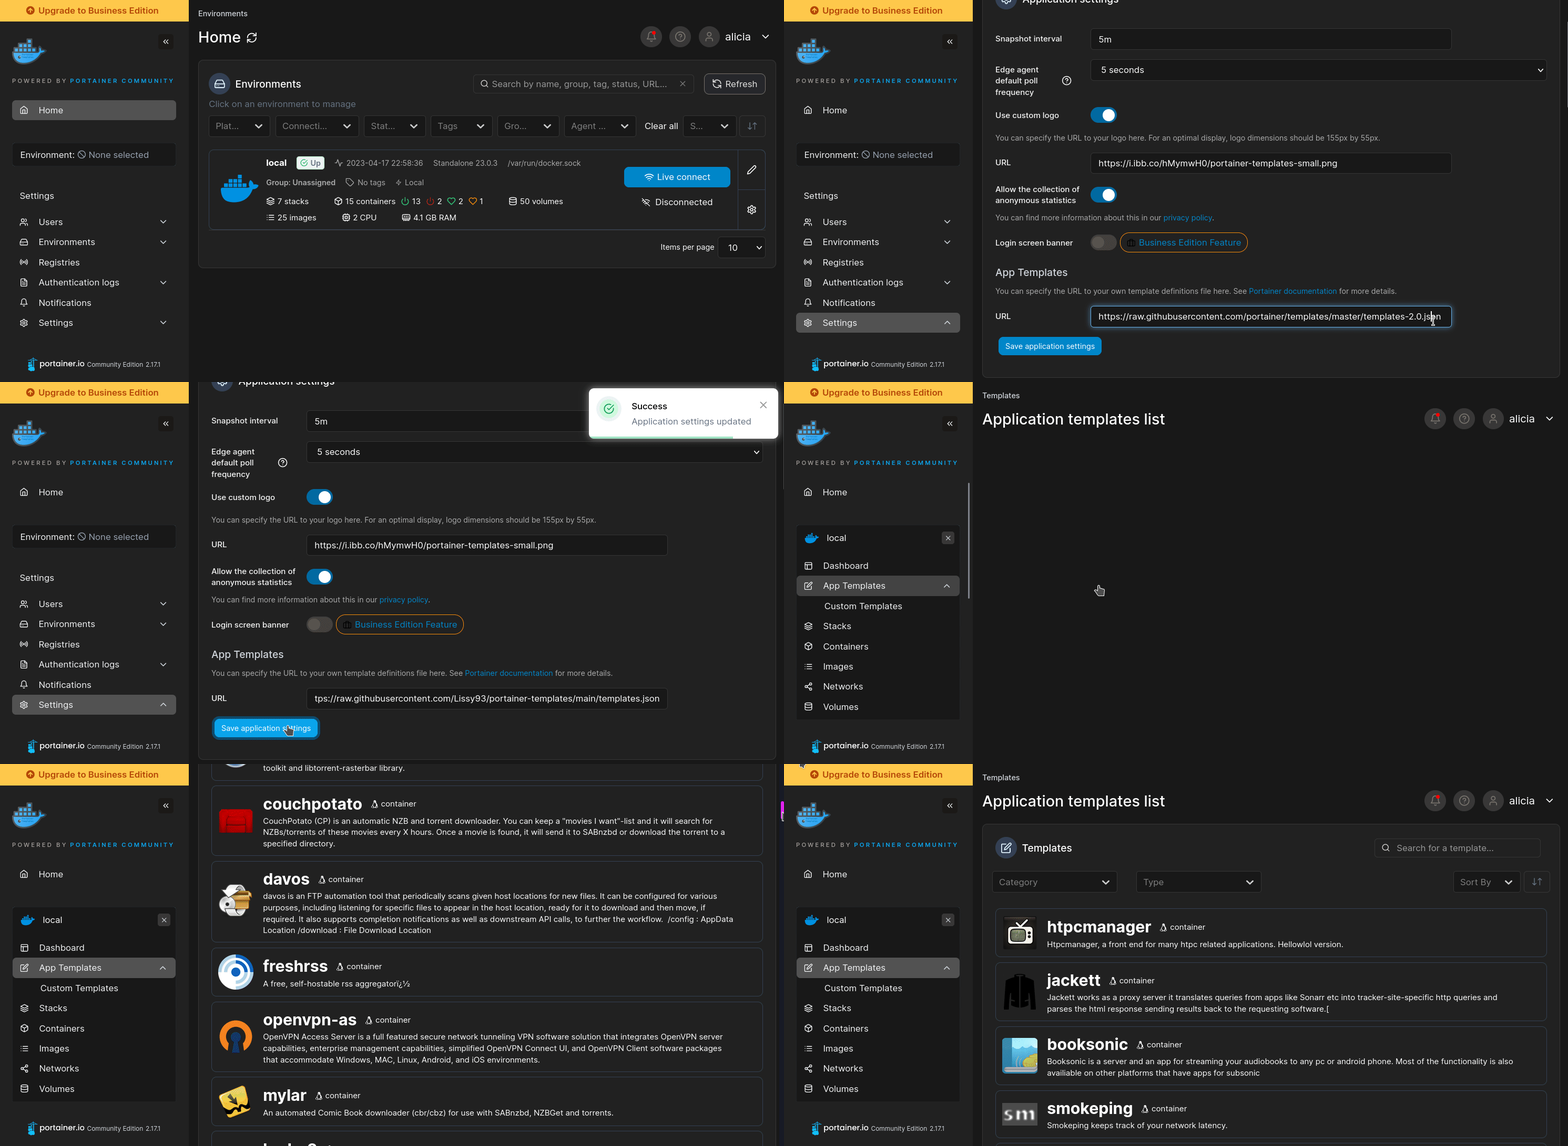
More install options in our documentation, or see passivelemon/terraria-docker for app-specific guidance.
terraria-docker


Unofficial Docker container for a Terraria dedicated server. Supports vanilla and modded through tModLoader.
!NOTE This is not at all affiliated with Terraria or tModLoader. Please report issues here.
Quick setup summary (Vanilla)
- Setup a directory for you server files. Can be something like
/opt/TerrariaServer/(Linux) orC:\TerrariaServer\(Windows). - Run the container: (Make sure to modify any values that you need)
docker run -d --name terraria -p 7777:7777/tcp -v /opt/TerrariaServer/:/opt/terraria/config/ -e WORLD=myworld passivelemon/terraria-docker:terraria-latest``- Setup server access.
Quick setup summary (Modded)
- Setup a directory for you server files. Can be something like
/opt/TerrariaServer/(Linux) orC:\TerrariaServer\(Windows). - Add your modpack to the previous directory in the sub-directory
ModPacks/(See step 3 further down) - Run the container: (Make sure to modify any values that you need)
docker run -d --name tmodloader1.4 -p 7777:7777/tcp -v /opt/TerrariaServer/:/opt/terraria/config/ -e MODPACK=<modpack name> -e WORLD=myworld passivelemon/terraria-docker:tmodloader-latest``- Setup server access.
- Setting up main server files
Depending on your host, find a suitable place to store your server files. Make sure it is empty, safe, and accessible. For example: On Windows, something like C:\TerrariaServer\ or a Linux equivalent like /opt/TerrariaServer/.!NOTE
For the sake of instruction, we will call this place <config_dir>. Any field wrapped in angle brackets is a field that needs to be substituted.In
<config_dir>, make one directory called Worlds, spelled exactly as show, and Modpacks if you are using tModLoader. This location is also where your serverconfig.txt will be stored if you want to use your own. Details on this are in step 4.- Server environment variables
For every variable you want the server to use, add that variable to your docker run or compose with -e <variable>=<value>. If not set, they will use their default value.By default, modded servers will not successfully run because they need a defined modpack.
Server configuration details on the Terraria Wiki.
Container variables
| Variable | Options | Default | Details |:-|:-|:-|:-| |PUID | integer | 1000 | The UID to run the server with. |
| PGID | integer | 1000 | The GID to run the server with. |
| SERVERCONFIG | boolean | 0 | Enable to use a user defined config file. Otherwise it is autogenerated by the other environment variables. |Server variables
!CAUTION In order to prevent world corruption, autocreate does not have a default value for the vanilla Terraria Docker image (This doesn't affect tModLoader). If autocreate is set smaller than your current world size, you will likely experience some world corruption. Bug report here. This corruption is not permanent, only visual.
| Variable | Options | Default | Details |
|---|---|---|---|
AUTOCREATE | 1 2 3 | NA (Vanilla), 2 (TML) | The world size to autocreate if the worldname is not found. 1 for small, 2 for medium, 3 for large. |
BANLIST | string | banlist.txt | The file with the list of banned players. |
DIFFICULTY | 0 1 2 3 | 0 | The difficulty level to use with autocreate. 0 for normal, 1 for expert, 2 for master, 3 for journey. |
LANGUAGE | en-US de-DE it-IT fr-FR es-ES ru-RU zh-Hans pt-BR pl-PL | en-US | The language to use. |
MAXPLAYERS | integer | 8 | The maximum amount of players that can be on the server. |
MODPACK | string | NA | The modpack to start the server with. This only works with tModLoader. |
MOTD | string | NA | The message of the day. |
NPCSTREAM | integer 0-60 | 15 | Helps with entity skipping. |
PASSWORD | string | NA | The password required to join the server. |
PORT | integer | 7777 | The port to join the server. |
PRIORITY | integer 0-5 | 1 | Server process priority. Lower means higher priority. |
SECURE | boolean | 1 | Cheat protection. |
SEED | string | NA | The seed to use with autocreate. |
UPNP | boolean | 0 | Automatically forward ports with uPNP. |
WORLDNAME | string | World | The name of the world. This determines which world file to load. |
Journey Mode
All Journey Mode variables have the same options. The default is2.
0 for no-one, 1 for host only, 2 for everyone.| Variable | Options | Default |
|---|---|---|
BIOMESPREADSETFROZEN | 0 1 2 | 2 |
GODMODE | ||
INCREASEPLACEMENTRANGE | ||
RAINSETFROZEN | ||
RAINSETSTRENGTH | ||
SETDIFFICULTY | ||
SETSPAWNRATE | ||
TIMESETDAWN | ||
TIMESETDUSK | ||
TIMESETFROZEN | ||
TIMESETMIDNIGHT | ||
TIMESETNOON | ||
TIMESETSPEED | ||
WINDSETFROZEN | ||
WINDSETSTRENGTH |
- Modpacks
If you are not using tModLoader, then skip this step.Ideally, you shouldn't include any client side only mods in the modpack folder for the server. Client side mods only affect the client (player) meaning they add zero new functionality to the game. Includes things like different textures, shaders, RPC, etc. Nothing bad should happen if you do but it's just best practice. Mods are included in the modpack folder so they do not need to be obtained manually.
- In tModLoader on a client, enable any mods that you want to play with.
- Go to the mod pack section.
- "Save Enabled as New Mod Pack"
- "Open Mod Pack folder"
- Copy the folder of the modpack you want to use in the server and paste that into
<config_dir>/ModPacks/
Make sure the modpack has an
enabled.json with the mods you want or else the server will not start.- Worlds
If you want to continue on an existing world, follow this step. Otherwise, just skip it. The server will generate a new world automatically.If you provide a world file and correctly set the
WORLDNAME variable, it will use the existing world.
If using tModLoader, make sure this world is always loaded with the same modpack or you may encounter world corruption.- Find your world file:
C:\Users\<user>\Documents\My Games\Terraria\Worlds\ or the Linux equivalent, usually /home/<user>/.local/share/Terraria/Worlds/.
- Modded worlds can be found at C:\Users\<user>\Documents\My Games\Terraria\tModLoader\Worlds\ or the Linux equivalent, usually /home/<user>/.local/share/Terraria/tModLoader/Worlds/.- Copy the files of the world of your choice to
<config_dir>/Worlds/. The world files look like.wldand, if using tModLoader,.twld.
- Server config
If you want to use your own server config, follow this step. Otherwise, just skip it. The server will generate a config automatically based on your provided environment variables. The root of the terraria server files in the container is
/opt/terraria/server/ and user items in <config_dir> are mounted at /opt/terraria/config/- Set
SERVERCONFIGto 1. - Put the
serverconfig.txtinto<config_dir>.
Server configuration details on the Terraria Wiki.
- Docker container
| Tag | Details |
|---|---|
latest | Same as terraria-latest. |
terraria-latest | Latest official Terraria release. |
terraria-<version> | Specific version of Terraria. |
tmodloader-latest | Latest tModLoader release (stable). |
tmodloader-latest-pre | Latest tModLoader pre-release (unstable). |
tmodloader-<year> | Latest tModLoader year release (stable). |
tmodloader-<year>-pre | Latest tModLoader year pre-release (unstable). |
tmodloader-<version> | Specific version of tModLoader. |
Though stable are likely fine, it is recommended to pin the server to a specific version to avoid potential save corruption.
Terraria versions at releases. tModLoader versions at tModLoader (Do not include the
v prefix).Docker run
docker run -d --name <container name> -p 7777:7777 -v <config_dir>:/opt/terraria/config/ passivelemon/terraria-docker:terraria-latestDocker Compose
services:
  terraria-docker:
    image: passivelemon/terraria-docker:terraria-latest
    container_name: terraria-docker
    ports:
      - 7777:7777
    volumes:
- <config_dir>:/opt/terraria/config/| Operator | Need | Details |
|---|---|---|
-d | Yes | Will run the container in the background. |
--name <container name> | No | Sets the name of the container to the following string. You can change this to whatever you want. |
-p 7777:7777 | Yes | The default port used by the server. This translates from your host 7777 into the container 7777. If you use a different port for your server in your serverconfig, change this. |
-v <configdir>:/opt/terraria/config | Yes | Sets the directory that holds the configs like your worlds and serverconfig.txt. This should be the place you chose at the beginning. |
passivelemon/terraria-docker:terraria-latest | Yes | The Docker image. By default, it is the latest version. |
Examples
Docker run
docker run -d --name terraria -p 7777:7777/tcp -v /opt/terrariaServer/:/opt/terraria/config/ -e WORLD=myworld passivelemon/terraria-docker:terraria-latestDocker compose
services:
  terraria-docker:
    image: passivelemon/terraria-docker:terraria-latest
    container_name: terraria-docker
    ports:
      - 7777:7777
    volumes:
      - /opt/terrariaServer/:/opt/terraria/config/
    environment:
      WORLDNAME: "myworld"
Healthcheck
If you have a service that depends on the health state of the container, you can add a healthcheck as such:services:
terraria-docker:
# ...
healthcheck:
test: "nc -vz 127.0.0.1 7777 || exit 1" # Change 7777 to your internal server port if needed
interval: 30s
timeout: 5s
start_period: 10s
retries: 3- Reference
Your config directory should look something like:
<config_dir>\       # This gets mounted to /opt/terraria/config/ in the container.
  Logs\             # This is optional. Make sure to mount it if you want it to be populated.
  Worlds\           # Default folder needed by the server.
  ModPacks\         # Modpack directory if using tModLoader.
serverconfig.txt # config file needed by the server (Only if you want to use your own).- Access
Theres a few ways around this:- Playing completely over LAN. If your server and players are on the same network, then you can use the local IP of the server host.
- Playing over a VPN like Tailscale, ZeroTier, or other. You can then follow the same logic as LAN.
- Playing remotely through a domain or public IP. See below.
Unless you plan to play completely locally or over a VPN, you will need to port forward for players outside of your network to access the server. The general idea of port forwarding is when a client sends a request to the server (with a specific port), a properly set up port forward will allow the request to go through and to the specified host. Terraria uses 7777 by default but you can change this in your config file.
If you do not have access to your network infrastructure, you will need to resort to either playing over LAN or a VPN.
- Head to your router web interface by typing your gateway IP into your router. It might be
192.168.1.1,172.1.0.1or something else. This will vary depending on how your network is setup.
- Find the port forwarding section. Your router management software is probably going to be different but theres a good chance that its just called "port forwarding" or under a "NAT" tab or something of the likes.
- Set the external or incoming port. This is the port that players will type when they try to join your server.
- Set the internal or outgoing port. This is the port that will be used by Docker. This is the first part of the
-p 7777:7777.
- Set your destination IP. This will be the IP of your server/host. There are many ways to find it. Go to your terminal: Windows is
ipconfig. Most Linux distros haveip aorifconfigor a similar command. Look for your interface, whether it is wifi or wired, and find your IPV4 address. It might look like192.168.1.XXXor172.1.0.XXX. Again, will probably be different.
- Find your public IP address. You can go to whatismyip or elsewhere and use the IPv4 address that it returns. If have a domain, you probably don't need these instructions.
!NOTE Your public IP might eventually change if it is not static. You can work around this with a DDNS like DuckDNS or FreeDNS.
You will also need a port. If you didn't change the defaults, it will just be 7777. If you did change from defaults, it will be whatever port you set as your external port in your router.
More info on the Fandom and at whatismyip.com/port-forwarding/.
- Other
Command injection
You can run the commanddocker exec <container name> inject "<command>" to inject a command directly into the server. An example: docker exec terraria inject "say Hello from the server!"More info on the Terraria Wiki.
Caching dotnet
If you would like for the container to not attempt to download dotnet every boot, then add a volume flag to your container to/opt/terraria/server/dotnet/. Ex: -v <config_dir>/dotnet_cache.Just beware that there could be versioning issues in the future if the target dotnet runtime version is updated, hence why the dotnet runtime is not saved by default.
- The end
Assuming you did everything correctly, you should have a functional server that will automatically load the world upon start.Have fun!
Credits
rfvgyhn for the server injection functionality.Serve Terraria Server {shmolf} on your own domain behind Caddy, Nginx or Traefik. Fill in your domain and copy the result. It's a starting point, some apps need their own base URL or extra headers set too.
Proxying terraria-server-shmolf.example.com to http://terraria-server:7777
Add this to your Caddyfile
terraria-server-shmolf.example.com {
	reverse_proxy http://terraria-server:7777
}Check the logs first
Nine times out of ten the logs tell you exactly what went wrong.
- In Portainer, go to Containers, click the container, then Logs. Or run
docker logs terraria-server - Exit codes help too:
137means killed, usually out of memory.126or127means the command inside the image is broken.
Port already in use
If deployment fails with "Bind for 0.0.0.0:7777 failed: port is already allocated", something else on your server is using that port.
- Find what's using it:
sudo ss -tlnp | grep :7777 - Stop the other service, or pick a different host port. In
7777:7777only the left number is yours to change, the right one belongs to the app.
Running but the page won't load
The container is up but nothing appears in your browser.
- Use your server's real IP:
http://your-server-ip:7777. The 0.0.0.0 link Portainer shows isn't a real address. - Give it a minute after first deploy, terraria-server can take a while to initialise.
- Make sure your firewall allows the port, e.g.
sudo ufw allow 7777
Permission denied on volumes
If the logs show "permission denied", the app can't write to its data folder on the host.
- Fix the ownership:
sudo chown -R 1000:1000 /portainer/Files/AppData/Libraries/StirlingPDF/tessdata - Or set the
PUIDandPGIDvariables (defaults 1000:1000) to match your own user, found withid $USER
Image won't pull
Test the pull directly on the host: docker pull passivelemon/terraria-docker:latest
- "manifest unknown" means the tag no longer exists. This template uses
latest, so try pinning a specific version instead. - "toomanyrequests" is the Docker Hub rate limit. Log in with
docker loginto raise it. - "no space left on device" means a full disk. Reclaim space with
docker system prune
"exec format error"
This means the image was built for a different CPU architecture than your server.
- This image supports:
amd64 - Check yours with
uname -m: x86_64 is amd64, aarch64 is arm64. Raspberry Pi and other ARM boards are the usual culprits.
Container keeps restarting
The unless-stopped restart policy relaunches the app after every crash, so the real error can scroll past.
- Check the logs right after a restart, the last few lines before it died are the useful ones.
- Get the exit code with
docker inspect terraria-server --format '{{.State.ExitCode}}' - Still stuck? Redeploy once with the restart policy set to
noso the failure stays visible.
Raise an issue
Found something which isn't working as it should? Here's how to report it.
- Bug within the app: Open an issue on passivelemon/terraria-docker
- Template not working: Open an issue on shmolf/portainer-templates
- This website not working: Open an issue on lissy93/portainer-templates
A single container
Terraria Server {shmolf} runs as one container, the simplest kind of app here. Just the one image to pull and nothing else wired up alongside it.
The app image
An image is the app packed up ready to go, everything Terraria Server {shmolf} needs bundled into one download. This template pulls passivelemon/terraria-docker:latest, which Docker fetches once (about 131 MB) and then starts your own copy from.
Where the image comes from
Docker pulls its images from registries, public libraries of ready-built apps. Terraria Server {shmolf}'s comes from Docker Hub, published by passivelemon.
Version tags
The bit after the colon in the image name is the version tag. Here it's latest, which always points at the newest build, so a redeploy can bump you to a newer release without you asking. Pin a specific tag if you would rather stay on one version.
Which machines it runs on
Every image is built for particular CPU types. This one ships for amd64, so it runs on regular x86 PCs and servers, though not ARM boards like a Raspberry Pi.
Ports
A port is the door the app answers on. A mapping like 7777:7777 means it's reachable on port 7777 of your server, where the left number is yours to change and the right one belongs to the app. It opens:
7777:7777
Volumes
A volume is where Terraria Server {shmolf} keeps its files so they survive an update or a restart. Without one, anything it saves would sit inside the container and vanish the moment it's recreated. This template mounts:
/usr/share/tesseract-ocr/5/tessdatafrom/portainer/Files/AppData/Libraries/StirlingPDF/tessdataon the host
Environment variables
Environment variables are the settings you hand over when you deploy, things like a password or a timezone. Terraria Server {shmolf} takes 3 of them, all with defaults you can leave alone or tweak:
PUID, defaults to1000PGID, defaults to1000WORLD, defaults todockerworld. World name
Restart policy
The restart policy here is unless-stopped, so Docker restarts Terraria Server {shmolf} after a crash or reboot, but leaves it off when you stop it on purpose. You can change this on the deploy screen. The choices are no (never restart), on-failure (only after a crash), unless-stopped (restart unless you stop it), and always (bring it back no matter what).
Users and permissions
The PUID and PGID settings tell it which user and group to act as on your host. Point them at your own account (find yours with id $USER) so the files it writes into your mounted folders come out owned by you rather than root.
Networking
Nothing custom is set, so Terraria Server {shmolf} sits on Docker's default bridge network: its own private space that reaches the outside world only through the ports it publishes.
Container name
Once it's deployed, Portainer names the container terraria-server. That's what you'll spot in the containers list and use in commands like docker logs terraria-server.
Platform
The platform is linux, the kind of system the container is built to run on. Docker and Portainer handle this on a normal Linux server.
Open source license
Terraria Server {shmolf} is open source, released under the GPL-3.0 license. In plain terms the code is out in the open, so you're free to run it and change it to fit what you need.
Portainer app templates
Zooming out, this whole page comes from a Portainer app template: a short recipe telling Portainer how to set Terraria Server {shmolf} up. Add the template list to Portainer once, then deploying Terraria Server {shmolf} is a click rather than a wall of config.