
![Terraria Server]() Terraria Server
Terraria Server
Stack
Dedicated Terraria server in a Docker container. Source: https://github.com/hexlo/terraria-server-docker
Image details
Source details
Configuration
TypeComposelinuxhexlo/terraria-server-docker:latest7779:7777/root/.local/share/Terraria/Worlds : terraria-worldsworld=/root/.local/share/Terraria/Worlds/newworld.wldpassword=${SERVER_PASSWORD:-changeme123}motd=${MOTD:-Welcome to my server!}SERVER_PASSWORD=changeme123MOTD=Welcome to my server!unless-stoppedStandalone Install
Select an install method, to see config/commands for deploying Terraria Server
Install on Portainer
Import all app templates into your Portainer instance, for easy 1-click deploys
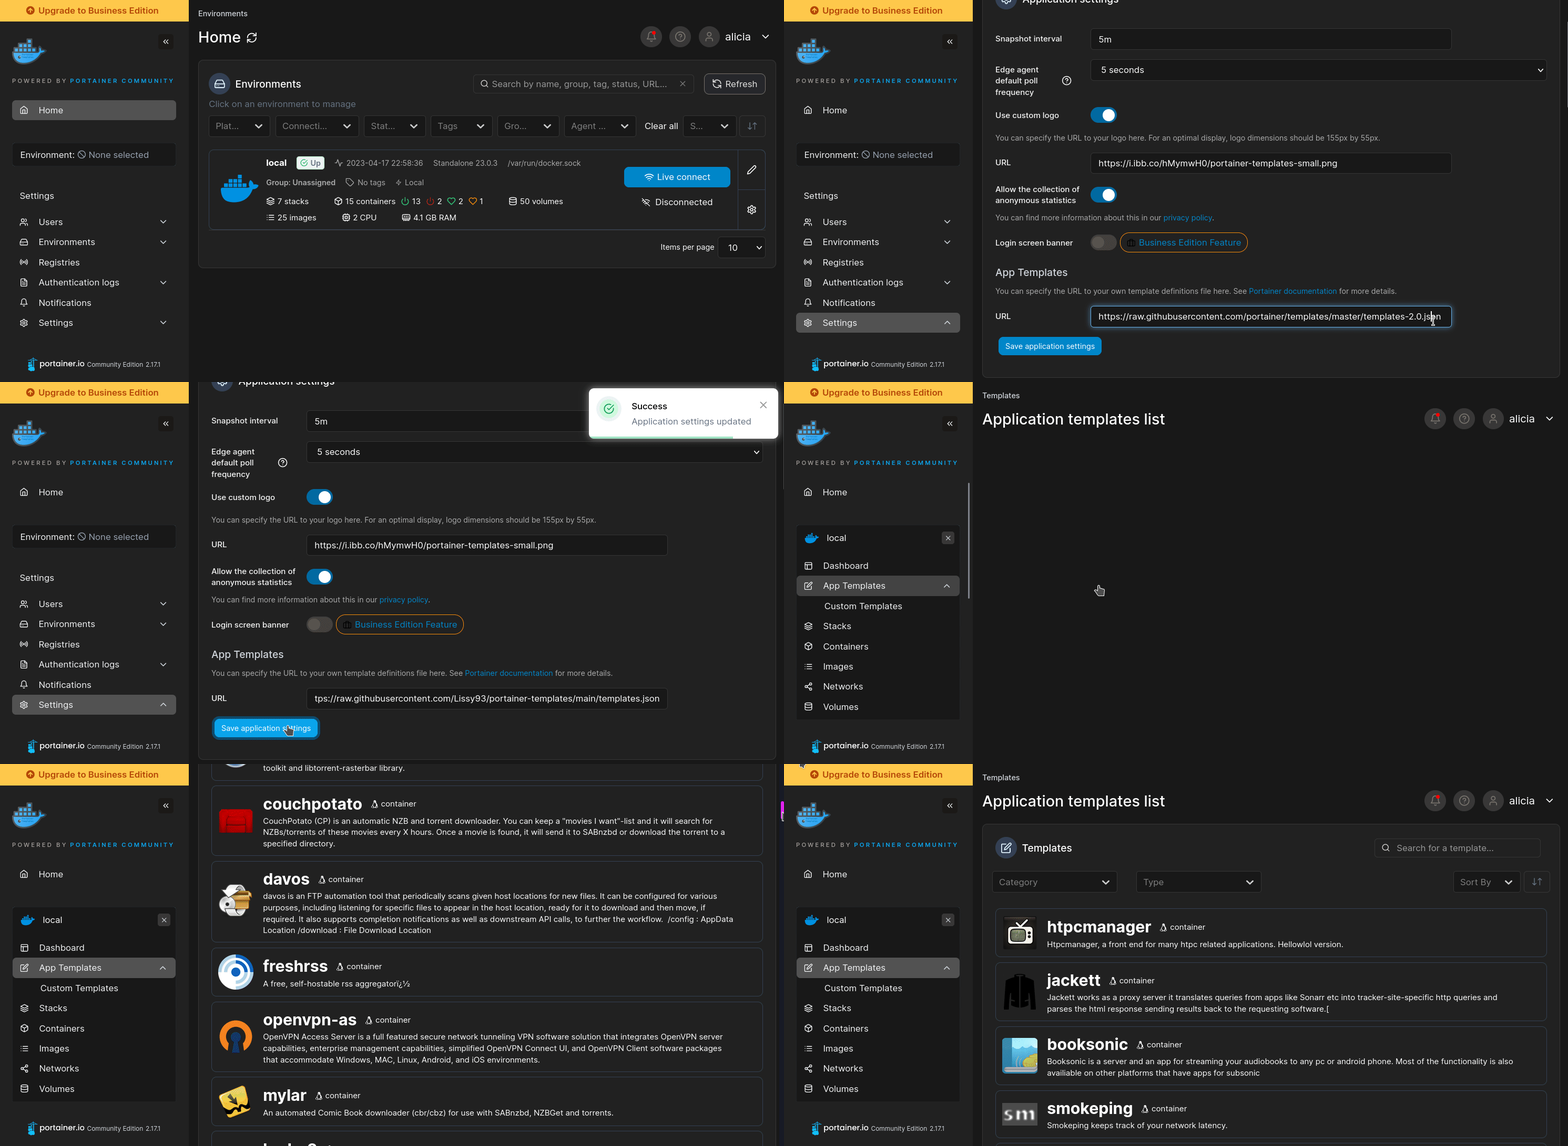
- Ensure both Docker and Portainer are installed, and up-to-date
- Log into your Portainer web UI
- Under Settings → App Templates, paste the below URL
- Head to Home → App Templates, and the list of apps will show up
- Select Terraria Server, fill in any config options, and hit Deploy
Template Import URL
https://raw.githubusercontent.com/Lissy93/portainer-templates/main/templates.json
Show Me
Original stackfile
The compose file this template deploys, straight from its repo:
services:
  terraria-server:
    # GitHub mirror: ghcr.io/hexlo/terraria-server-docker:latest
    image: hexlo/terraria-server-docker:latest
    container_name: terraria-server
    restart: unless-stopped
    stdin_open: true
    tty: true
    ports:
      - "7779:7777"
    volumes:
      - terraria-worlds:/root/.local/share/Terraria/Worlds
    environment:
      - world=/root/.local/share/Terraria/Worlds/newworld.wld
      - password=${SERVER_PASSWORD:-changeme123}
      - motd=${MOTD:-Welcome to my server!}

volumes:
  terraria-worlds:
Or deploy it directly from the source:
git clone https://github.com/lissy93/portainer-templates
cd portainer-templates
docker compose -f sources/stacks/terraria-server.yml up -d
More install options in our documentation, or see hexlo/terraria-server-docker for app-specific guidance.

__  __     ______     __  __     __         ______
/\ \_\ \   /\  ___\   /\_\_\_\   /\ \       /\  __ \
\ \  __ \  \ \  __\   \/_/\_\/_  \ \ \____  \ \ \/\ \
\ \_\ \_\  \ \_____\   /\_\/\_\  \ \_____\  \ \_____\
 \/_/\/_/   \/_____/   \/_/\/_/   \/_____/   \/_____/
===> Now supports arm64
Terraria Vanilla Server
This is a Vanilla server for Terraria PC, packaged as a docker image.
Docker Hub image:
hexlo/terraria-server-docker:latestRequirements
Server-side:- Docker
- docker-compose (recommended)
Client-side:
- Terraria
General Config
- Either clone this repo or create a folder called Worlds
- Create a
docker-compose.ymlat the same level as the Worlds folder (see example below)
docker-compose-example.yml to docker-compose.yml and modify it as well.- Edit the environment variables as you see fit. They are explained in a table further down.
docker-compose.yml example:
version: '3'
services:
  terraria-server:
    image: hexlo/terraria-server-docker:latest
    container_name: terraria-server
    restart: unless-stopped
    stdin_open: true
    tty: true
    ports:
      - 7779:7777
    volumes:
      - ./Worlds:/root/.local/share/Terraria/Worlds/
    environment:
      - world=/root/.local/share/Terraria/Worlds/world1.wld
      - autocreate=2
      - worldname=world1
      - difficulty=1
      - maxplayers=8
      - port=7777
      - password=mypassword
- motd="Welcome to hexlo's server! :)"- Launch the container. If you are using a command line interface (cli):
docker-compose up -dCreating and using Worlds
Using existing worlds
Terraria worlds have a.wld extentionIf you have a compatible world already that you would like to use, you can simply put the file in the
Worlds directory and make sure the world variable is set to match it's name. Creating a new world
There is two ways to create a new world.- Using variables in the
docker-compose.ymlfile (recommended) - By spinning a container, manually attaching to it and going through the command prompts of the terraria server.
1. Using variables in the docker-compose.yml file:
You need to set certain variables in the
environment: part of the docker-compose.yml file, as follows:
...
    environment:
      - world=/root/.local/share/Terraria/Worlds/world1.wld
      - autocreate=2
      - worldname=world1
      - difficulty=1
...2. Manually create a world:
You can create a new world or select different world served by a container by attaching to it.
docker attach <container-name>- press enter
- Go through the options
To dettach without stopping the container:
ctrl+p ctrl+qImportant!
If you want the server to start automatically on subsequent runs, you need to provide a world path to an existing world, by defining the environment variableworld as shown in the exemple above.Environment Variables
Note: These are case-sensitive!| Env variable | Default value | Description | Example |
|---|---|---|---|
world | (empty) | Path to your world. You need to provide a world for the server to start automatically | world=/root/.local/share/Terraria/Worlds/MyWorld.wld |
autocreate | 2 | Creates a world if none is found in the path specified by -world. World size is specified by: 1(small), 2(medium), and 3(large). | autocreate=2 |
seed | (empty) | Specifies the world seed when using -autocreate | seed=someseed123 |
worldname | (empty) | Sets the name of the world when using -autocreate. | worldname=world1 |
difficulty | 0 | Sets world difficulty when using autocreate. Options: 0(normal), 1(expert), 2(master), 3(journey) | difficulty=1 |
maxplayers | 16 | The maximum number of players allowed | maxplayers=8 |
port | 7777 | Port used internally by the terraria server. You should not change this. | port=8123 |
password | (empty) | Set a password for the server | password=serverpassword |
motd | (empty) | Set the server motto of the day text. | motd="Welcome to my private server! :)" |
worldpath | /root/.local/share/Terraria/Worlds | Sets the directory where world files will be stored | worldpath=/some/other/dir |
banlist | banlist.txt | The location of the banlist. Defaults to "banlist.txt" in the working directory. | banlist=/configs/banlist.txt -> this would imply that you mount your banlist.txt file in the container's path /configs/banlist.txt |
secure | 1 | Option to prevent cheats. (1: no cheats or 0: cheats allowed) | secure=0 |
language | en/US | Sets the server language from its language code. Available codes: en/US = English de/DE = German it/IT = Italian fr/FR = French es/ES = Spanish ru/RU = Russian zh/Hans = Chinese pt/BR = Portuguese pl/PL = Polish | language=fr/FR |
upnp | 1 | Enables/disables automatic universal plug and play. | upnp=0 |
npcstream | 1 | Reduces enemy skipping but increases bandwidth usage. The lower the number the less skipping will happen, but more data is sent. 0 is off. | npcstream=60 |
priority | (empty) | Sets the process priority | priority=1 |
Important!
If theworld variable is left empty or not included, the server will need to be initialized manually after the container is spun up. You will need to attach to the container and select/create a world and set the players number, port and password manually. If you create a new world, it will be saved in the path defined by the environment variable worldpath.1.
docker attach <container name>
2. press enter
3. Go through the options
4. Detach from the container by pressing ctrl+p + ctrl+q- If, after creating your world with a specific seed, the server still doesn't initializes automatically, be sure to comment or remove the
seed=<yourseed>variable in the docker-compose.yml file.
List of server-side console commands from the unofficial wiki
Once a dedicated server is running, the following commands can be run.\ First, attach to the container withdocker attach <container name>.
help - Displays a list of commands.
playing - Shows the list of players. This can be used in-game by typing /playing into the chat.
clear - Clear the console window.
exit - Shutdown the server and save.
exit-nosave - Shutdown the server without saving.
save - Save the game world.
kick <player name> - Kicks a player from the server.
ban <player name> - Bans a player from the server.
password - Show password.
password <pass> - Change password.
version - Print version number.
time - Display game time.
port - Print the listening port.
maxplayers - Print the max number of players.
say <message> - Send a message to all players. They will see the message in yellow prefixed with <server> in the chat.
motd - Print MOTD.
motd <message> - Change MOTD.
dawn - Change time to dawn (4:30 AM).
noon - Change time to noon (12:00 PM).
dusk - Change time to dusk (7:30 PM).
midnight - Change time to midnight (12:00 AM).
settle - Settle all water.

Banning and un-banning
The command ban <player> will ban the indicated player from the server. A banned player, when they try to login, will be displayed the message:You are banned for [duration]: [reason]- [modname]. A banned player may then be un-banned by editing the file "banlist.txt," which is located in the Terraria folder. This document contains a list of all currently banned players. To un-ban a player, delete the player's name and IP address from the list./ is needed before the command, as some command interfaces require.Serve Terraria Server on your own domain behind Caddy, Nginx or Traefik. Fill in your domain and copy the result. It's a starting point, some apps need their own base URL or extra headers set too.
Proxying terraria-server.example.com to http://terraria-server:7777
Add this to your Caddyfile
terraria-server.example.com {
	reverse_proxy http://terraria-server:7777
}Check the logs first
Nine times out of ten the logs tell you exactly what went wrong.
- In Portainer, go to Containers, click the container, then Logs. Or run
docker logs <container> - Exit codes help too:
137means killed, usually out of memory.126or127means the command inside the image is broken.
Port already in use
If deployment fails with "Bind for 0.0.0.0:7779 failed: port is already allocated", something else on your server is using that port.
- Find what's using it:
sudo ss -tlnp | grep :7779 - Stop the other service, or pick a different host port. In
7779:7777only the left number is yours to change, the right one belongs to the app.
Running but the page won't load
The container is up but nothing appears in your browser.
- Use your server's real IP:
http://your-server-ip:7779. The 0.0.0.0 link Portainer shows isn't a real address. - Give it a minute after first deploy, terraria-server can take a while to initialise.
- Make sure your firewall allows the port, e.g.
sudo ufw allow 7779
Image won't pull
Test the pull directly on the host: docker pull hexlo/terraria-server-docker:latest
- "manifest unknown" means the tag no longer exists. This template uses
latest, so try pinning a specific version instead. - "toomanyrequests" is the Docker Hub rate limit. Log in with
docker loginto raise it. - "no space left on device" means a full disk. Reclaim space with
docker system prune
"exec format error"
This means the image was built for a different CPU architecture than your server.
- This image supports:
amd64, arm64 - Check yours with
uname -m: x86_64 is amd64, aarch64 is arm64. Raspberry Pi and other ARM boards are the usual culprits.
Container keeps restarting
The unless-stopped restart policy relaunches the app after every crash, so the real error can scroll past.
- Check the logs right after a restart, the last few lines before it died are the useful ones.
- Get the exit code with
docker inspect <container> --format '{{.State.ExitCode}}' - Still stuck? Redeploy once with the restart policy set to
noso the failure stays visible.
Stack won't deploy
Compose stacks fail fast on small mistakes, and Portainer shows the reason just above the editor.
- YAML only accepts spaces for indentation, a single tab breaks the whole file.
Raise an issue
Found something which isn't working as it should? Here's how to report it.
- Bug within the app: Open an issue on hexlo/terraria-server-docker
- Template not working: Open an issue within the template's repo
- This website not working: Open an issue on lissy93/portainer-templates
A Compose stack
Terraria Server is a Compose stack, a set of containers defined in one file and brought up together by Portainer, then started and stopped as a single app.
The app image
An image is the app packed up ready to go, everything Terraria Server needs bundled into one download. This template pulls hexlo/terraria-server-docker:latest, which Docker fetches once (about 124 MB) and then starts your own copy from.
Where the image comes from
Docker pulls its images from registries, public libraries of ready-built apps. Terraria Server's comes from Docker Hub, published by hexlo.
Version tags
The bit after the colon in the image name is the version tag. Here it's latest, which always points at the newest build, so a redeploy can bump you to a newer release without you asking. Newest right now is 1.4.5.8. Pin a specific tag if you would rather stay on one version.
Which machines it runs on
Every image is built for particular CPU types. This one ships for amd64, arm64, so it runs on both regular x86 servers and ARM boards like a Raspberry Pi.
Ports
A port is the door the app answers on. A mapping like 7779:7777 means it's reachable on port 7779 of your server, where the left number is yours to change and the right one belongs to the app. It opens:
7779:7777
Volumes
A volume is where Terraria Server keeps its files so they survive an update or a restart. Without one, anything it saves would sit inside the container and vanish the moment it's recreated. This template mounts:
/root/.local/share/Terraria/Worldskept in theterraria-worldsvolume Docker manages
Environment variables
Environment variables are the settings you hand over when you deploy, things like a password or a timezone. Terraria Server takes 5 of them, all with defaults you can leave alone or tweak:
world, defaults to/root/.local/share/Terraria/Worlds/newworld.wldpassword, defaults tochangeme123motd, defaults toWelcome to my server!SERVER_PASSWORD, defaults tochangeme123. Server passwordMOTD, defaults toWelcome to my server!. Message of the day
Restart policy
The restart policy here is unless-stopped, so Docker restarts Terraria Server after a crash or reboot, but leaves it off when you stop it on purpose. You can change this on the deploy screen. The choices are no (never restart), on-failure (only after a crash), unless-stopped (restart unless you stop it), and always (bring it back no matter what).
Networking
Nothing custom is set, so Terraria Server sits on Docker's default bridge network: its own private space that reaches the outside world only through the ports it publishes.
Container name
Once it's deployed, Portainer names the container terraria-server. That's what you'll spot in the containers list and use in commands like docker logs terraria-server.
Platform
The platform is linux, the kind of system the container is built to run on. Docker and Portainer handle this on a normal Linux server.
Portainer app templates
Zooming out, this whole page comes from a Portainer app template: a short recipe telling Portainer how to set Terraria Server up. Add the template list to Portainer once, then deploying Terraria Server is a click rather than a wall of config.