
![TiddlyWiki]() TiddlyWiki
TiddlyWiki
Container
A unique, non-linear notebook wiki.
Image details
Configuration
TypeContainerlinuxnicolaw/tiddlywiki:latest8080:8080/tcp/var/lib/tiddlywiki : /portainer/Files/AppData/Config/TiddlyWikiunless-stoppedTemplate by novaspirit
Report issueNotes
Check our Github page: https://github.com/pi-hosted/pi-hosted
Official Webpage: https://tiddlywiki.com/
Official Docker Documentation: https://gitlab.com/nicolaw/tiddlywiki
Pre-installation script must be RAN before you install: wget -qO- https://raw.githubusercontent.com/pi-hosted/pi-hosted/master/tools/install_tiddlywiki.sh | bash
Standalone Install
Select an install method, to see config/commands for deploying TiddlyWiki
Install on Portainer
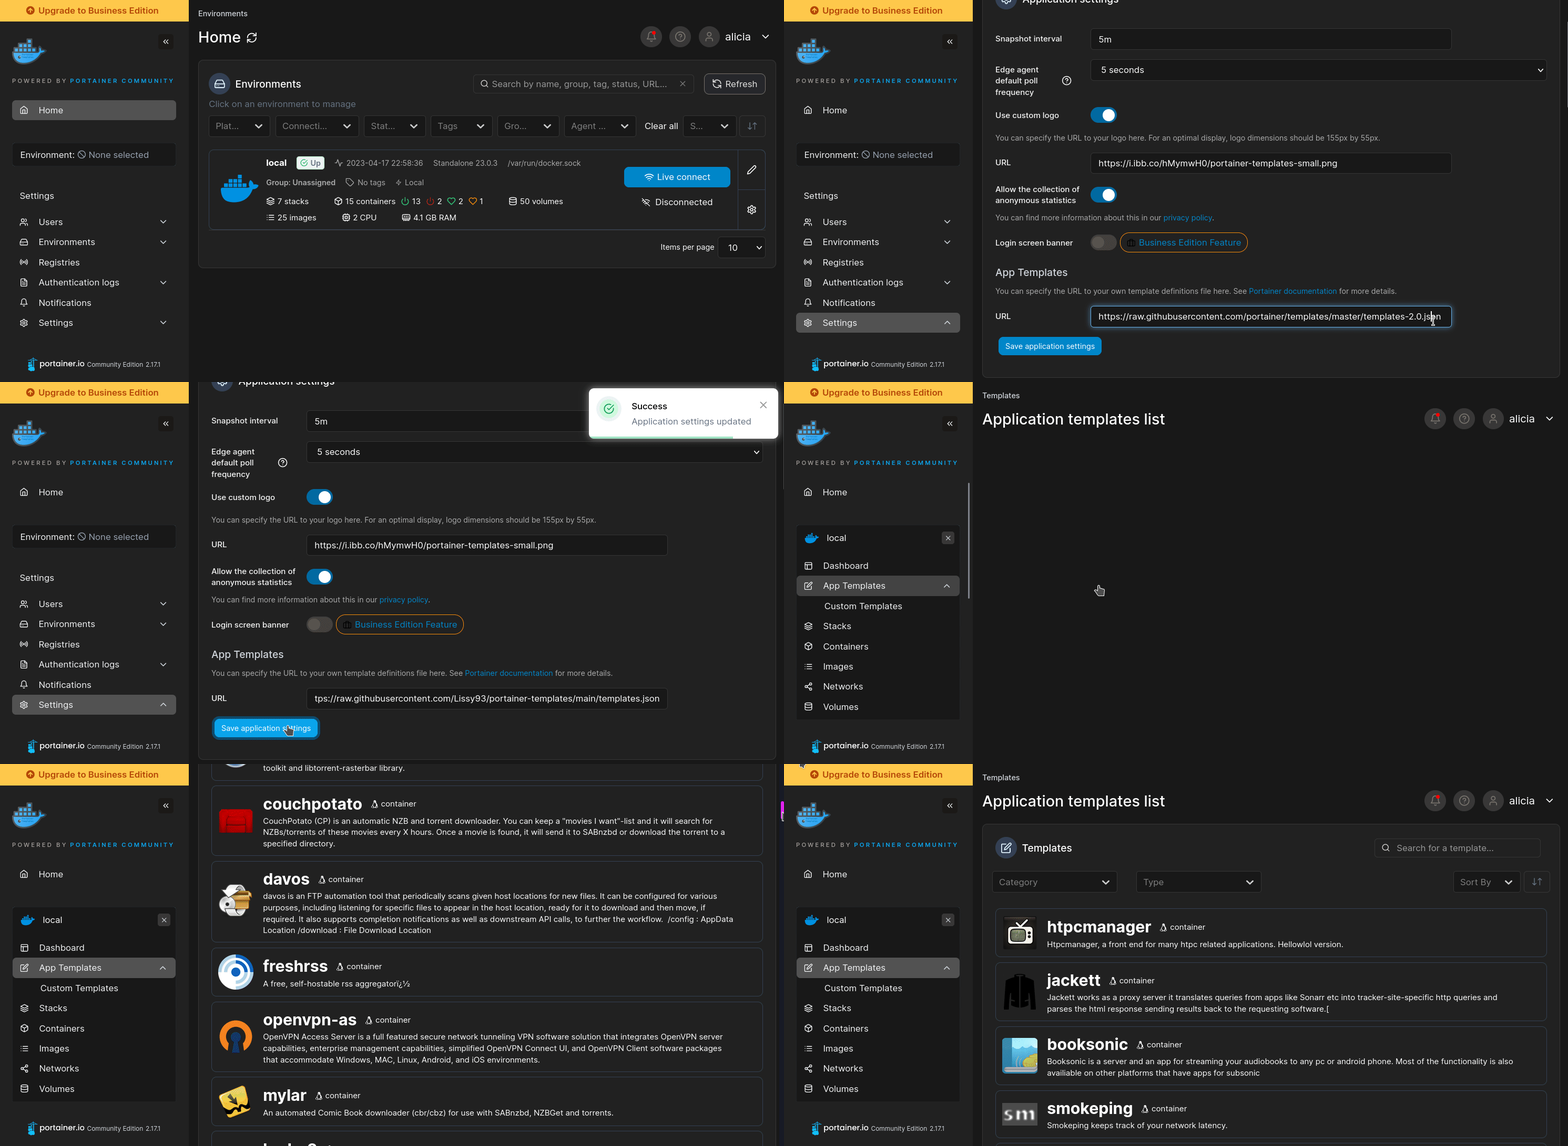
Import all app templates into your Portainer instance, for easy 1-click deploys
- Ensure both Docker and Portainer are installed, and up-to-date
- Log into your Portainer web UI
- Under Settings → App Templates, paste the below URL
- Head to Home → App Templates, and the list of apps will show up
- Select TiddlyWiki, fill in any config options, and hit Deploy
Template Import URL
https://raw.githubusercontent.com/Lissy93/portainer-templates/main/templates.json
Show Me
More install options in our documentation.
tiddlywiki
TiddlyWiki 5 Docker image.Supported Tags
5.3.6,5.3.6-node20.18-alpine3.19,latest5.2.2,5.2.2-node17.9-alpine3.155.2.0,5.2.0-node17.0-alpine3.135.1.23,5.1.23-node14.18.1-alpine3.145.1.22,5.1.22-node14.9.0-alpine3.12
Images are available for
amd64, arm/v6, arm/v7, arm64, ppc64le, s390x architectures.Requirements
- Install Docker. See https://docs.docker.com/install/ for help. For lazy and
non-security minded Linux users, simply run the following command:
`curl -fsSL get.docker.com | sudo bash`- If you want to automatically start TiddlyWiki on boot, you will need to be
running a recent Linux distribution that uses systemd. (Ubuntu 12 or older,
for example, do not support systemd by default).
Manual Execution
$ docker run -p 8080:8080 --name mywiki nicolaw/tiddlywikiOpen your browser to http://localhost:8080 to access the TiddlyWiki.
Alternatively the following will instruct Docker to keep your TiddlyWiki container running at all times untill explicitly stopped with a
docker stop or
docker kill command:$ mkdir ~/tiddlywiki
$ docker run \
-p 8080:8080 -d --restart unless-stopped --name mywiki \
-v ~/tiddlywiki:/var/lib/tiddlywiki \
nicolaw/tiddlywikiSystemd Service
A systemd service unit file is included in the source repository of this project. (See https://gitlab.com/nicolaw/tiddlywiki). This can be installed to automatically start one or more TiddlyWikis every time your machine boots.It also provides you with some level of configurability by simply changing the contents of the
/etc/tiddlywiki/mywiki.conf configuration file.$ sudo mkdir /etc/tiddlywiki/
$ sudo cp tiddlywiki.service /etc/systemd/system/mywiki.service
$ sudo cp tiddlywiki.conf /etc/tiddlywiki/mywiki.conf
$ sudo systemctl daemon-reload
$ sudo systemctl start mywiki.serviceCheck the status of the TiddlyWiki service, or watch the logs using the following commands:
$ sudo systemctl status mywiki.service
$ sudo journalctl -f -u mywiki.service
Tiddler Data Storage
The container stores the Tiddler data in/var/lib/tiddlywiki. This will
automatically be saved inside an anonymous Docker volume.Specifying a volume bind mount location for
/var/lib/tiddlywiki will cause the
Tiddler data to be written to that location on your local filesystem.$ docker run --rm -p 8080:8080 -v ~/wikidata:/var/lib/tiddlywiki --name mywiki nicolaw/tiddlywikiIn the case of operating TiddlyWiki from systemd, the Docker volume has the same name as the systemd service name (
mywiki.service by default). Use
docker volume inspect mywiki.service see where your data is being stored
on disk in the event that you wish to perform a backup.Alternatively, to specify a bind mount location, uncomment and modify the
TW_DOCKERVOLUME line, and optionally the TW_DOCKERUID and TW_DOCKERGID
lines in the /etc/tiddlywiki/mywiki.conf configuration file.You will need to restart the service once you have saved your file change.
$ sudo vi /etc/tiddlywiki/mywiki.conf
$ sudo systemctl restart mywiki.service
Authentication
By default, the username is set toanonymous with no password.Specify the
TW_USERNAME and TW_PASSWORD environment variables to enable
password authentication.$ docker run -p 8080:8080 -e "TW_USERNAME=$USER" -e "TW_PASSWORD=hunter2" --name mywiki nicolaw/tiddlywikiSimilarly if you are using systemd to start your TiddlyWiki, uncomment and modify the
TW_USERNAME and TW_PASSWORD lines from the
/etc/tiddlywiki/mywiki.conf file.You will need to restart the service once you have saved your file change.
$ sudo vi /etc/tiddlywiki/mywiki.conf
$ sudo systemctl restart mywiki.service
Configurable Variables
Refer to the canonical online documentation for help for additional help.- https://tiddlywiki.com/static/Using%2520TiddlyWiki%2520on%2520Node.js.html
- https://tiddlywiki.com/static/ServerCommand.html
TW_WIKINAME=mywiki
TW_USERNAME=janedoe
TW_PASSWORD=
TW_PORT=8080
TW_ROOTTIDDLER=$:/core/save/all
TW_RENDERTYPE=text/plain
TW_SERVETYPE=text/html
TW_HOST=0.0.0.0
TW_PATHPREFIX=
You can alter how the NodeJS tiddlywiki server will operate by changing these two variables.
If you are operating in a low memory environment (inside a small AWS, GCE or other cloud virtual machine for example), you may wish to set
NODE_MEM to specify the maximum memory can NodeJS may use (specified in MB).NODE_MEM=400
NODE_OPTIONS=The following variables only affect the operation while using the system service unit to start TiddlyWiki. They do nothing if you are running the Docker container independently of systemd.
TW_DOCKERVOLUME=/home/janedoe/tiddlywiki
TW_DOCKERUID=0
TW_DOCKERGID=0
Docker Compose
More experienced users may wish to usedocker-compose to dynamically build a
customised container image using the Git source repostiory as the build context.
This allows control over the following Dockerfile build arguments:TW_VERSION- The upstream version of TiddlyWiki to install from NPM
BASE_IMAGE- The Docker base container image to inherit from (should
node interpreter)USER- Unix user or UID to run the TiddlyWiki process as (useful if
The
Makefile in the https://gitlab.com/nicolaw/tiddlywiki.git also makes use
of these build arguments in a similar way.Example partial Docker compose definition:
tiddlywiki:
  container_name: tiddlywiki
  image: nicolaw/tiddlywiki
  build:
    context: https://gitlab.com/nicolaw/tiddlywiki.git
    args:
      TW_VERSION: 5.2.2
      USER: 501
      BASE_IMAGE: 17.9-alpine3.15
````

To use the provided https://gitlab.com/nicolaw/tiddlywiki/-/blob/master/docker-compose.yaml:

```console
$ docker-compose up -d
Starting tiddlywiki ... done
Packer AWS AMIs
A Packer HCL definition https://gitlab.com/nicolaw/tiddlywiki/-/blob/master/docker-compose.yaml provides an easy mechanism to build an AWS EC2 AMI.$ packer init .
$ packer build .Public AWS AMIs are made available from the under the owner accound ID
172306058616 in the eu-west-2 EU London region.$ aws ec2 describe-images \
--region eu-west-2 --owners 172306058616 \
--filters 'Name=name,Values=tiddlywiki-*' 'Name=architecture,Values=x86_64' \
--query 'sort_by(Images, &CreationDate)[-1].ImageId' --output text
ami-00e143acd635f8693This TiddlyWiki AMI will listen on port 80 by default for greater convenience.
Tiddler data is stored in a bind mount under
/home/ec2-user/tiddlywiki by
default.Refer to the configuration variables documentation above to modify these settings in the
/etc/tiddlywiki/tiddlywiki.conf configuration file.
The TiddlyWiki service may be restarted using Systemd:$ systemctl restart tiddlywiki.serviceAuthor
Nicola WorthingtonLicense
MIT LicenseCopyright (c) 2018-2022 Nicola Worthington
Permission is hereby granted, free of charge, to any person obtaining a copy of this software and associated documentation files (the "Software"), to deal in the Software without restriction, including without limitation the rights to use, copy, modify, merge, publish, distribute, sublicense, and/or sell copies of the Software, and to permit persons to whom the Software is furnished to do so, subject to the following conditions:
The above copyright notice and this permission notice shall be included in all copies or substantial portions of the Software.
THE SOFTWARE IS PROVIDED "AS IS", WITHOUT WARRANTY OF ANY KIND, EXPRESS OR IMPLIED, INCLUDING BUT NOT LIMITED TO THE WARRANTIES OF MERCHANTABILITY, FITNESS FOR A PARTICULAR PURPOSE AND NONINFRINGEMENT. IN NO EVENT SHALL THE AUTHORS OR COPYRIGHT HOLDERS BE LIABLE FOR ANY CLAIM, DAMAGES OR OTHER LIABILITY, WHETHER IN AN ACTION OF CONTRACT, TORT OR OTHERWISE, ARISING FROM, OUT OF OR IN CONNECTION WITH THE SOFTWARE OR THE USE OR OTHER DEALINGS IN THE SOFTWARE.
Serve TiddlyWiki on your own domain behind Caddy, Nginx or Traefik. Fill in your domain and copy the result. It's a starting point, some apps need their own base URL or extra headers set too.
Proxying tiddlywiki.example.com to http://tiddlywiki:8080
Add this to your Caddyfile
tiddlywiki.example.com {
	reverse_proxy http://tiddlywiki:8080
}Check the logs first
Nine times out of ten the logs tell you exactly what went wrong.
- In Portainer, go to Containers, click the container, then Logs. Or run
docker logs tiddlywiki - Exit codes help too:
137means killed, usually out of memory.126or127means the command inside the image is broken.
Port already in use
If deployment fails with "Bind for 0.0.0.0:8080 failed: port is already allocated", something else on your server is using that port.
- Find what's using it:
sudo ss -tlnp | grep :8080 - Stop the other service, or pick a different host port. In
8080:8080only the left number is yours to change, the right one belongs to the app.
Running but the page won't load
The container is up but nothing appears in your browser.
- Use your server's real IP:
http://your-server-ip:8080. The 0.0.0.0 link Portainer shows isn't a real address. - Give it a minute after first deploy, tiddlywiki can take a while to initialise.
- Make sure your firewall allows the port, e.g.
sudo ufw allow 8080
Permission denied on volumes
If the logs show "permission denied", the app can't write to its data folder on the host.
- Fix the ownership:
sudo chown -R 1000:1000 /portainer/Files/AppData/Config/TiddlyWiki
Image won't pull
Test the pull directly on the host: docker pull nicolaw/tiddlywiki:latest
- "manifest unknown" means the tag no longer exists. This template uses
latest, so try pinning a specific version instead. - "toomanyrequests" is the Docker Hub rate limit. Log in with
docker loginto raise it. - "no space left on device" means a full disk. Reclaim space with
docker system prune
"exec format error"
This means the image was built for a different CPU architecture than your server.
- This image supports:
amd64, arm64, arm/v7, arm/v6, ppc64le, s390x - Check yours with
uname -m: x86_64 is amd64, aarch64 is arm64. Raspberry Pi and other ARM boards are the usual culprits.
Container keeps restarting
The unless-stopped restart policy relaunches the app after every crash, so the real error can scroll past.
- Check the logs right after a restart, the last few lines before it died are the useful ones.
- Get the exit code with
docker inspect tiddlywiki --format '{{.State.ExitCode}}' - Still stuck? Redeploy once with the restart policy set to
noso the failure stays visible.
Raise an issue
Found something which isn't working as it should? Here's how to report it.
- Bug within the app: Open an issue within tiddlywiki's repo
- Template not working: Open an issue on novaspirit/pi-hosted
- This website not working: Open an issue on lissy93/portainer-templates
A single container
TiddlyWiki runs as one container, the simplest kind of app here. Just the one image to pull and nothing else wired up alongside it.
The app image
An image is the app packed up ready to go, everything TiddlyWiki needs bundled into one download. This template pulls nicolaw/tiddlywiki:latest, which Docker fetches once (about 77 MB) and then starts your own copy from.
Where the image comes from
Docker pulls its images from registries, public libraries of ready-built apps. TiddlyWiki's comes from Docker Hub, published by nicolaw.
Version tags
The bit after the colon in the image name is the version tag. Here it's latest, which always points at the newest build, so a redeploy can bump you to a newer release without you asking. Newest right now is 5.3.6-node23.3-alpine3.19. Pin a specific tag if you would rather stay on one version.
Which machines it runs on
Every image is built for particular CPU types. This one ships for amd64, arm64, arm/v7, arm/v6, ppc64le, s390x, so it runs on both regular x86 servers and ARM boards like a Raspberry Pi.
Ports
A port is the door the app answers on. A mapping like 8080:8080 means it's reachable on port 8080 of your server, where the left number is yours to change and the right one belongs to the app. Once it's running, open http://your-server-ip:8080 in a browser. It opens:
8080:8080, likely the web interface
Volumes
A volume is where TiddlyWiki keeps its files so they survive an update or a restart. Without one, anything it saves would sit inside the container and vanish the moment it's recreated. This template mounts:
/var/lib/tiddlywikifrom/portainer/Files/AppData/Config/TiddlyWikion the host
Restart policy
The restart policy here is unless-stopped, so Docker restarts TiddlyWiki after a crash or reboot, but leaves it off when you stop it on purpose. You can change this on the deploy screen. The choices are no (never restart), on-failure (only after a crash), unless-stopped (restart unless you stop it), and always (bring it back no matter what).
Networking
Nothing custom is set, so TiddlyWiki sits on Docker's default bridge network: its own private space that reaches the outside world only through the ports it publishes.
Container name
Once it's deployed, Portainer names the container tiddlywiki. That's what you'll spot in the containers list and use in commands like docker logs tiddlywiki.
Platform
The platform is linux, the kind of system the container is built to run on. Docker and Portainer handle this on a normal Linux server.
Portainer app templates
Zooming out, this whole page comes from a Portainer app template: a short recipe telling Portainer how to set TiddlyWiki up. Add the template list to Portainer once, then deploying TiddlyWiki is a click rather than a wall of config.