
![Sshwifty]() Sshwifty
Sshwifty
Container
Sshwifty is a SSH and Telnet connector made for the Web. It can be deployed on your computer or server to provide SSH and Telnet access interface for any compatible (standard) web browser.
Image details
Source details
Configuration
TypeContainerlinuxniruix/sshwifty:latest8182:8182/tcpunless-stoppedTemplate by novaspirit
Report issueNotes
Check our Github page: https://github.com/pi-hosted/pi-hosted
Official Webpage: https://sshwifty.herokuapp.com/
Official Docker Documentation: https://github.com/nirui/sshwifty#docker-image
Standalone Install
Select an install method, to see config/commands for deploying Sshwifty
Install on Portainer
Import all app templates into your Portainer instance, for easy 1-click deploys
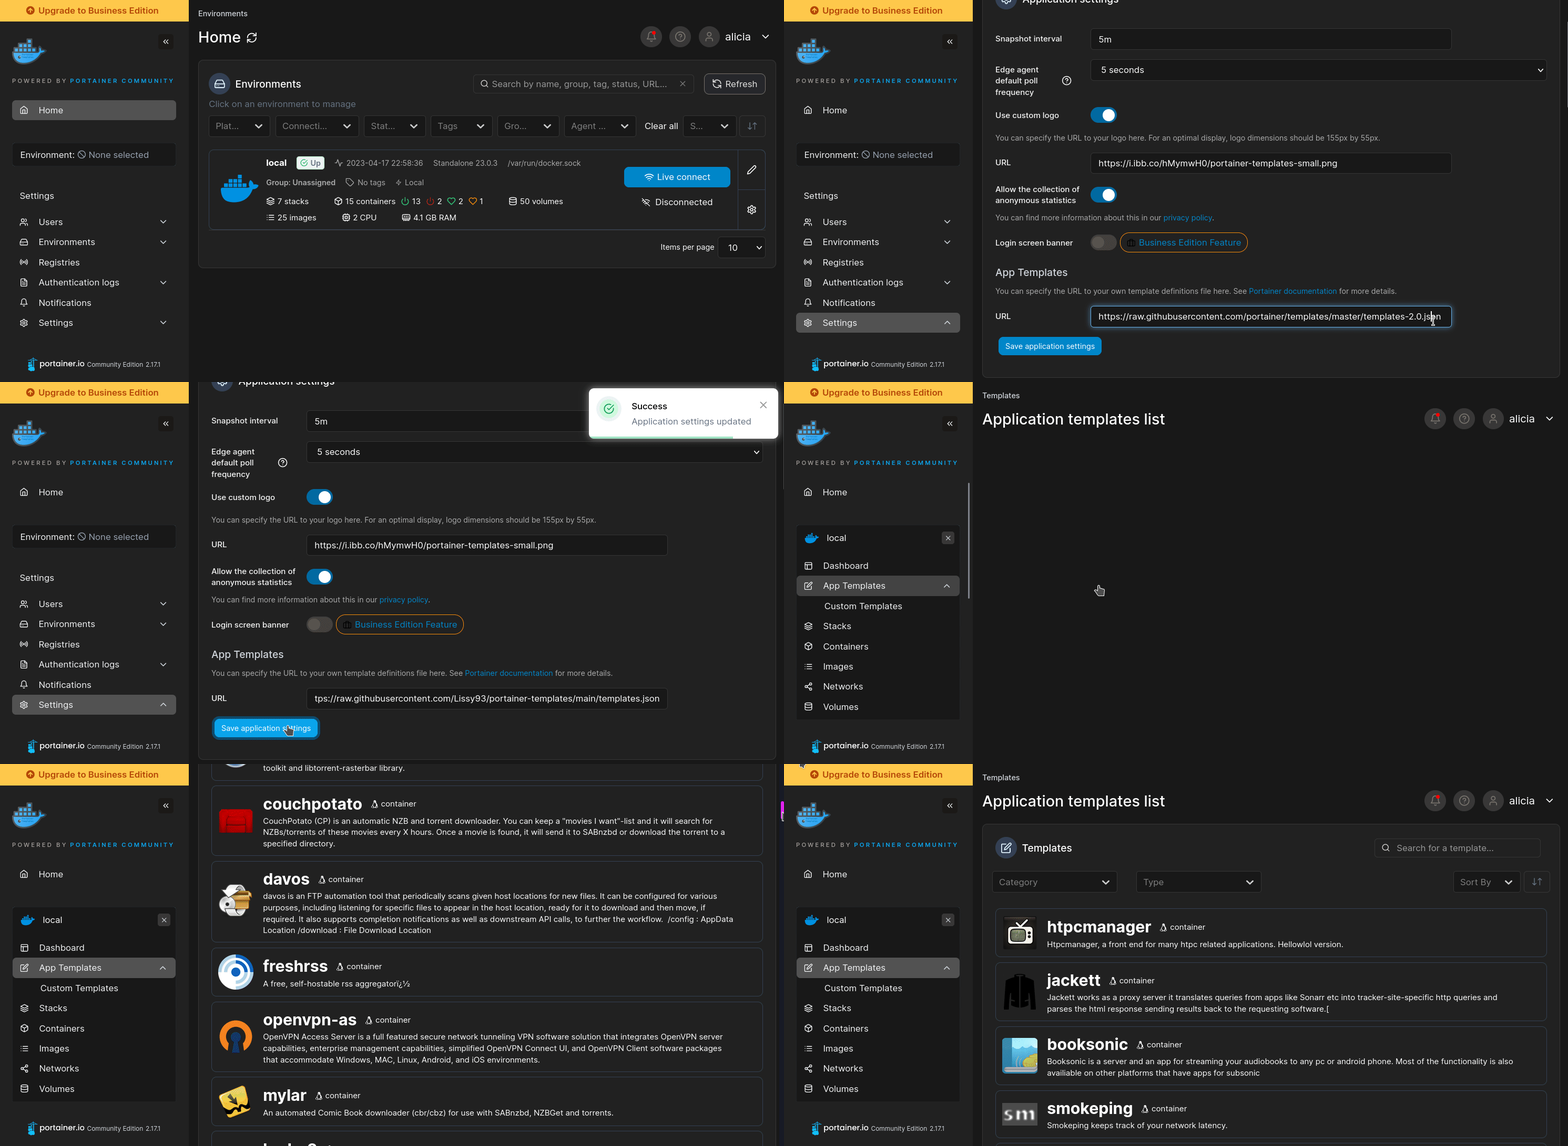
- Ensure both Docker and Portainer are installed, and up-to-date
- Log into your Portainer web UI
- Under Settings → App Templates, paste the below URL
- Head to Home → App Templates, and the list of apps will show up
- Select Sshwifty, fill in any config options, and hit Deploy
Template Import URL
https://raw.githubusercontent.com/Lissy93/portainer-templates/main/templates.json
Show Me
More install options in our documentation, or see nirui/sshwifty for app-specific guidance.
Sshwifty Web SSH & Telnet Client
Sshwifty is a SSH and Telnet connector made for the Web. It can be deployed on your computer or server to provide SSH and Telnet access interface for any compatible (standard) web browser.

Install
Binary
Compiled binaries can be found at the release section of the page.Please be advised that those binaries is generated by an automatic proccess, the author of this project will NOT verify them. You have to try it at your owk risk.
Docker Image
If Docker is installed on your machine, you may use our prebuild Docker Image by executing following command:$ docker run --detach \
--restart=always \
--publish 8182:8182 \
--name sshwifty \
niruix/sshwifty:latestWhen TLS is desired and you don't want to setup Docker Volumes, you can use
SSHWIFTY_DOCKER_TLSCERT and SSHWIFTY_DOCKER_TLSCERTKEY environment variables
to import credential files to the container and automatically apply them:$ openssl req \
-newkey rsa:4096 -nodes -keyout domain.key -x509 -days 90 -out domain.crt
$ docker run --detach \
--restart=always \
--publish 8182:8182 \
--env SSHWIFTY_DOCKER_TLSCERT="$(cat domain.crt)" \
--env SSHWIFTY_DOCKER_TLSCERTKEY="$(cat domain.key)" \
--name sshwifty \
niruix/sshwifty:latestThe
domain.crt and domain.key must be valid TLS certificate and key file
located on the same machine which the docker run command will be executed
upon.Compile from source code (Recommanded if you're a developer)
Following tools is required in order to build the software from source code:gitto download the source codenodeandnpmto build front-end applicationgoto build back-end application
To start the build process, execute:
$ git clone https://github.com/niruix/sshwifty
$ cd sshwifty
$ npm install
$ npm run build
When done, you can found the newly generated
sshwifty binary inside current
working directory.Notice:
Dockerfile contains the entire build procedure of this software.
Please refer to it when you encountered any compile/build related issue.Deploy on the cloud
To deploy this project onto the cloud, Google App Engine or Heroku for example, you need to first download the source code, then generate it locally before deploying it.npm run generate command will generate all static files and automatically
call go generate ./... to bind those static files directly into program source
code. And you need those generated source code to get the software to function.Trying to deploy ungenerated code directly to cloud will lead to failure, as required source code is missing.
Also keep in mind, if the cloud deployment process is
git based, you may have
to modify .gitignore file in order to allow all required files to be uploaded.Configure
Sshwifty can be configured through either file or environment variables. By default, the configuration loader will try to load file from default paths first, when failed, environment variables will be used.You can also specify your own configuration file by setting up
SSHWIFTY_CONFIG
environment variable before start the software. For example:$ SSHWIFTY_CONFIG=./sshwifty.conf.json ./sshwiftyThis way, Sshwifty will try to load the configuration from file
./sshwifty.conf.json, and never reach for other environment variables.Configuration file
Here is all the options of a configuration file:{
// HTTP Host. Keep it empty to accept request from all hosts, otherwise, only
// specified host is allowed to access
"HostName": "localhost",
// Web interface access password. Set to empty to allow public access
"SharedKey": "WEB_ACCESS_PASSWORD",
// Remote dial timeout. This limits how long of time the backend can spend
// to connect to a remote host. The max timeout will be determined by
// server configuration (ReadTimeout).
// (In Seconds)
"DialTimeout": 10,
// Socks5 proxy. When set, Sshwifty backend will try to connect remote through
// the given proxy
"Socks5": "localhost:1080",
// Username of the Socks5 server. Please set when needed
"Socks5User": "",
// Password of the Socks5 server. Please set when needed
"Socks5Password": "",
// Sshwifty HTTP server, you can set multiple ones to serve on different
// ports
"Servers": [
{
// Which local network interface this server will be listening
"ListenInterface": "0.0.0.0",
// Which local network port this server will be listening
"ListenPort": 8182,
// Timeout of initial request. HTTP handshake must be finished within
// this time
// (In Seconds)
"InitialTimeout": 3,
// How long do the connection can stay in idle before the backend server
// disconnects the client
// (In Seconds)
"ReadTimeout": 60,
// How long the server will wait until the client connection is ready to
// recieve new data. If this timeout is exceed, the connection will be
// closed.
// (In Seconds)
"WriteTimeout": 60,
// The interval between internal echo requests
// (In Seconds)
"HeartbeatTimeout": 20,
// Forced delay between each request
// (In Milliseconds)
"ReadDelay": 10,
// Forced delay between each write
// (In Milliseconds)
"WriteDelay": 10,
// Path to TLS certificate file. Set empty to use HTTP
"TLSCertificateFile": "",
// Path to TLS certificate key file. Set empty to use HTTP
"TLSCertificateKeyFile": ""
},
{
"ListenInterface": "0.0.0.0",
"ListenPort": 8182,
"InitialTimeout": 3,
.....
}
],
// Remote Presets, the operater can define few presets for user so the user
// won't have to manually fill-in all the form fields
//
// Presets will be displayed in the "Known remotes" tab on the Connector
// window
//
// Notice: You can use the same JSON value for `SSHWIFTY_PRESETS` if you are
// configuring your Sshwifty through enviroment variables.
//
// Warning: Presets Data will be sent to user client WITHOUT any protection.
// DO NOT add any secret information into Preset.
//
"Presets": [
{
// Title of the preset
"Title": "SDF.org Unix Shell",
// Preset Types, i.e. Telnet, and SSH
"Type": "SSH",
// Target address and port
"Host": "sdf.org:22",
// Form fields and values, you have to manually validate the correctness
// of the field value
"Meta": {
// Data for predefined User field
"User": "pre-defined-username",
// Data for predefined Encoding field. Valid data is those displayed on
// the page
"Encoding": "pre-defined-encoding",
// Data for predefined Password field
"Password": "pre-defined-password",
// Data for predefined Private Key field, should contains the content
// of a Key file
"Private Key": "-----BEGIN RSA PRIV...\nMIIE...\n-----END RSA PRI...\n",
// Data for predefined Authentication field. Valid values is what
// displayed on the page (Password, Private Key, None)
"Authentication": "Password",
}
},
{
"Title": "Endpoint Telnet",
"Type": "Telnet",
"Host": "endpoint.vaguly.com:23",
"Meta": {
// Data for predefined Encoding field. Valid data is those displayed on
// the page
"Encoding": "utf-8"
....
}
},
....
],
// Allow the Preset Remotes only, and refuse to connect to any other remote
// host
//
// NOTICE: You can only configure OnlyAllowPresetRemotes through a config
// file. This option is not supported when you are configuring with
// environment variables
OnlyAllowPresetRemotes: false
}sshwifty.conf.example.json is an example of a valid configuration file.Environment variables
Valid environment variables are:SSHWIFTY_HOSTNAME
SSHWIFTY_SHAREDKEY
SSHWIFTY_DIALTIMEOUT
SSHWIFTY_SOCKS5
SSHWIFTY_SOCKS5_USER
SSHWIFTY_SOCKS5_PASSWORD
SSHWIFTY_LISTENPORT
SSHWIFTY_INITIALTIMEOUT
SSHWIFTY_READTIMEOUT
SSHWIFTY_WRITETIMEOUT
SSHWIFTY_HEARTBEATTIMEOUT
SSHWIFTY_READDELAY
SSHWIFTY_WRITEELAY
SSHWIFTY_LISTENINTERFACE
SSHWIFTY_TLSCERTIFICATEFILE
SSHWIFTY_TLSCERTIFICATEKEYFILE
SSHWIFTY_PRESETS
SSHWIFTY_ONLYALLOWPRESETREMOTESThe option they represented is corresponded to their counterparts in the configuration file.
Notice: When you're using environment variables to configure Sshwifty, only one Sshwifty HTTP server is then allowed. There is no way to setup mulitple servers under this method of configuration. If you need to serve on multiple ports, use configuration file instead.
Be aware: An invalid value inside following environment variables will cause the value to be sliently reset to default during configuration parsing phase without warning:
SSHWIFTY_DIALTIMEOUT
SSHWIFTY_INITIALTIMEOUT
SSHWIFTY_READTIMEOUT
SSHWIFTY_WRITETIMEOUT
SSHWIFTY_HEARTBEATTIMEOUT
SSHWIFTY_READDELAY
SSHWIFTY_WRITEELAY
FAQ
Why the software says "The time difference is beyond operational limit"?
This software requires both the client and the server are running at the same date time.Please reload the page. If the error message won't go away, consider resync the time on both the client and the server with a trusted time server.
Why I got error "TypeError: Cannot read property 'importKey' of undefined"
It's usually because your web browser does not support WebCrypt API, or the support has been disabled.If you're using Google Chrome, please connect Sshwifty with HTTPS. Chrome will disable WebCrypt and many other APIs when the connection is not safe.
License
Code of this project is licensed under AGPL, see LICENSE.md for detail.Third-party components used by this project are licensed under their respective licenses. See DEPENDENCIES.md for dependencies used by this project.
Contribute
This is a hobbyist project, meaning I don't have too many time to put into it. Sorry.Upon release (Which is then you're able to read this file), this project will enter maintaining state, which includes doing bug fix and security updates. Adding new features however, is not a part of the state.
Please do not send pull request. If you need new feature, fork it, add it by yourself, and maintain it like one of your own project.
(Notice: Typo, grammar error or invalid use of language in the source code and document is categorized as bug, please report them if you found any. Thank you!)
Appreciate your help!
Enjoy!
Serve Sshwifty on your own domain behind Caddy, Nginx or Traefik. Fill in your domain and copy the result. It's a starting point, some apps need their own base URL or extra headers set too.
Proxying sshwifty.example.com to http://Sshwifty:8182
Add this to your Caddyfile
sshwifty.example.com {
	reverse_proxy http://Sshwifty:8182
}Check the logs first
Nine times out of ten the logs tell you exactly what went wrong.
- In Portainer, go to Containers, click the container, then Logs. Or run
docker logs Sshwifty - Exit codes help too:
137means killed, usually out of memory.126or127means the command inside the image is broken.
Port already in use
If deployment fails with "Bind for 0.0.0.0:8182 failed: port is already allocated", something else on your server is using that port.
- Find what's using it:
sudo ss -tlnp | grep :8182 - Stop the other service, or pick a different host port. In
8182:8182only the left number is yours to change, the right one belongs to the app.
Running but the page won't load
The container is up but nothing appears in your browser.
- Use your server's real IP:
http://your-server-ip:8182. The 0.0.0.0 link Portainer shows isn't a real address. - Give it a minute after first deploy, Sshwifty can take a while to initialise.
- Make sure your firewall allows the port, e.g.
sudo ufw allow 8182
Image won't pull
Test the pull directly on the host: docker pull niruix/sshwifty:latest
- "manifest unknown" means the tag no longer exists. This template uses
latest, so try pinning a specific version instead. - "toomanyrequests" is the Docker Hub rate limit. Log in with
docker loginto raise it. - "no space left on device" means a full disk. Reclaim space with
docker system prune
"exec format error"
This means the image was built for a different CPU architecture than your server.
- This image supports:
amd64, arm64, arm/v7, arm, arm64/v8 - Check yours with
uname -m: x86_64 is amd64, aarch64 is arm64. Raspberry Pi and other ARM boards are the usual culprits.
Container keeps restarting
The unless-stopped restart policy relaunches the app after every crash, so the real error can scroll past.
- Check the logs right after a restart, the last few lines before it died are the useful ones.
- Get the exit code with
docker inspect Sshwifty --format '{{.State.ExitCode}}' - Still stuck? Redeploy once with the restart policy set to
noso the failure stays visible.
Data disappears when the container is recreated
This template doesn't define any volumes, so everything Sshwifty saves lives inside the container and is lost on update or recreate.
- Add a volume mapping for Sshwifty's data folder before storing anything you care about.
Raise an issue
Found something which isn't working as it should? Here's how to report it.
- Bug within the app: Open an issue on nirui/sshwifty
- Template not working: Open an issue on novaspirit/pi-hosted
- This website not working: Open an issue on lissy93/portainer-templates
A single container
Sshwifty runs as one container, the simplest kind of app here. Just the one image to pull and nothing else wired up alongside it.
The app image
An image is the app packed up ready to go, everything Sshwifty needs bundled into one download. This template pulls niruix/sshwifty:latest, which Docker fetches once (about 19 MB) and then starts your own copy from.
Where the image comes from
Docker pulls its images from registries, public libraries of ready-built apps. Sshwifty's comes from Docker Hub, published by niruix.
Version tags
The bit after the colon in the image name is the version tag. Here it's latest, which always points at the newest build, so a redeploy can bump you to a newer release without you asking. Newest right now is 0.0.4-prototype-release. Pin a specific tag if you would rather stay on one version.
Which machines it runs on
Every image is built for particular CPU types. This one ships for amd64, arm64, arm/v7, arm, arm64/v8, so it runs on both regular x86 servers and ARM boards like a Raspberry Pi.
Ports
A port is the door the app answers on. A mapping like 8182:8182 means it's reachable on port 8182 of your server, where the left number is yours to change and the right one belongs to the app. It opens:
8182:8182
No stored data
This template doesn't mount any storage, so whatever Sshwifty writes stays inside the container and is wiped if it's recreated or updated. That's fine for something stateless, but add a volume before trusting it with anything you want to keep.
Restart policy
The restart policy here is unless-stopped, so Docker restarts Sshwifty after a crash or reboot, but leaves it off when you stop it on purpose. You can change this on the deploy screen. The choices are no (never restart), on-failure (only after a crash), unless-stopped (restart unless you stop it), and always (bring it back no matter what).
Networking
Nothing custom is set, so Sshwifty sits on Docker's default bridge network: its own private space that reaches the outside world only through the ports it publishes.
Container name
Once it's deployed, Portainer names the container Sshwifty. That's what you'll spot in the containers list and use in commands like docker logs Sshwifty.
Platform
The platform is linux, the kind of system the container is built to run on. Docker and Portainer handle this on a normal Linux server.
Open source license
Sshwifty is open source, released under the AGPL-3.0 license. In plain terms the code is out in the open, so you're free to run it and change it to fit what you need.
Portainer app templates
Zooming out, this whole page comes from a Portainer app template: a short recipe telling Portainer how to set Sshwifty up. Add the template list to Portainer once, then deploying Sshwifty is a click rather than a wall of config.