
![Pixel-server]() Pixel-server
Pixel-server
Container
Wireless control of PixelStrips or NeoPixels using a web graphical interface running on a Raspberry Pi.
Image details
Source details
Configuration
TypeContainerlinuxmacley/pixel-server:latestYes85:80/tcp/opt/pixel-server/auth.cfg : /portainer/Files/AppData/Config/pixel-server/auth.cfg/opt/pixel-server/pixelserver.cfg : /portainer/Files/AppData/Config/pixel-server/pixelserver.cfg/opt/pixel-server/users.cfg : /portainer/Files/AppData/Config/pixel-server/users.cfg/etc/crontabs/unless-stoppedTemplate by novaspirit
Report issueNotes
Check our Github page: https://github.com/pi-hosted/pi-hosted
Official Webpage: http://www.penguintutor.com/projects/pixel-server
Official Docker Documentation: https://github.com/Macleykun/pixel-server
Pi-Hosted dedicated documentation: pixel-server_setup.md
Pre-installation script must be RAN before you install: wget -qO- https://raw.githubusercontent.com/pi-hosted/pi-hosted/master/tools/install_pixel-server.sh | bash
Standalone Install
Select an install method, to see config/commands for deploying Pixel-server
Install on Portainer
Import all app templates into your Portainer instance, for easy 1-click deploys
- Ensure both Docker and Portainer are installed, and up-to-date
- Log into your Portainer web UI
- Under Settings → App Templates, paste the below URL
- Head to Home → App Templates, and the list of apps will show up
- Select Pixel-server, fill in any config options, and hit Deploy
Template Import URL
https://raw.githubusercontent.com/Lissy93/portainer-templates/main/templates.json
Show Me
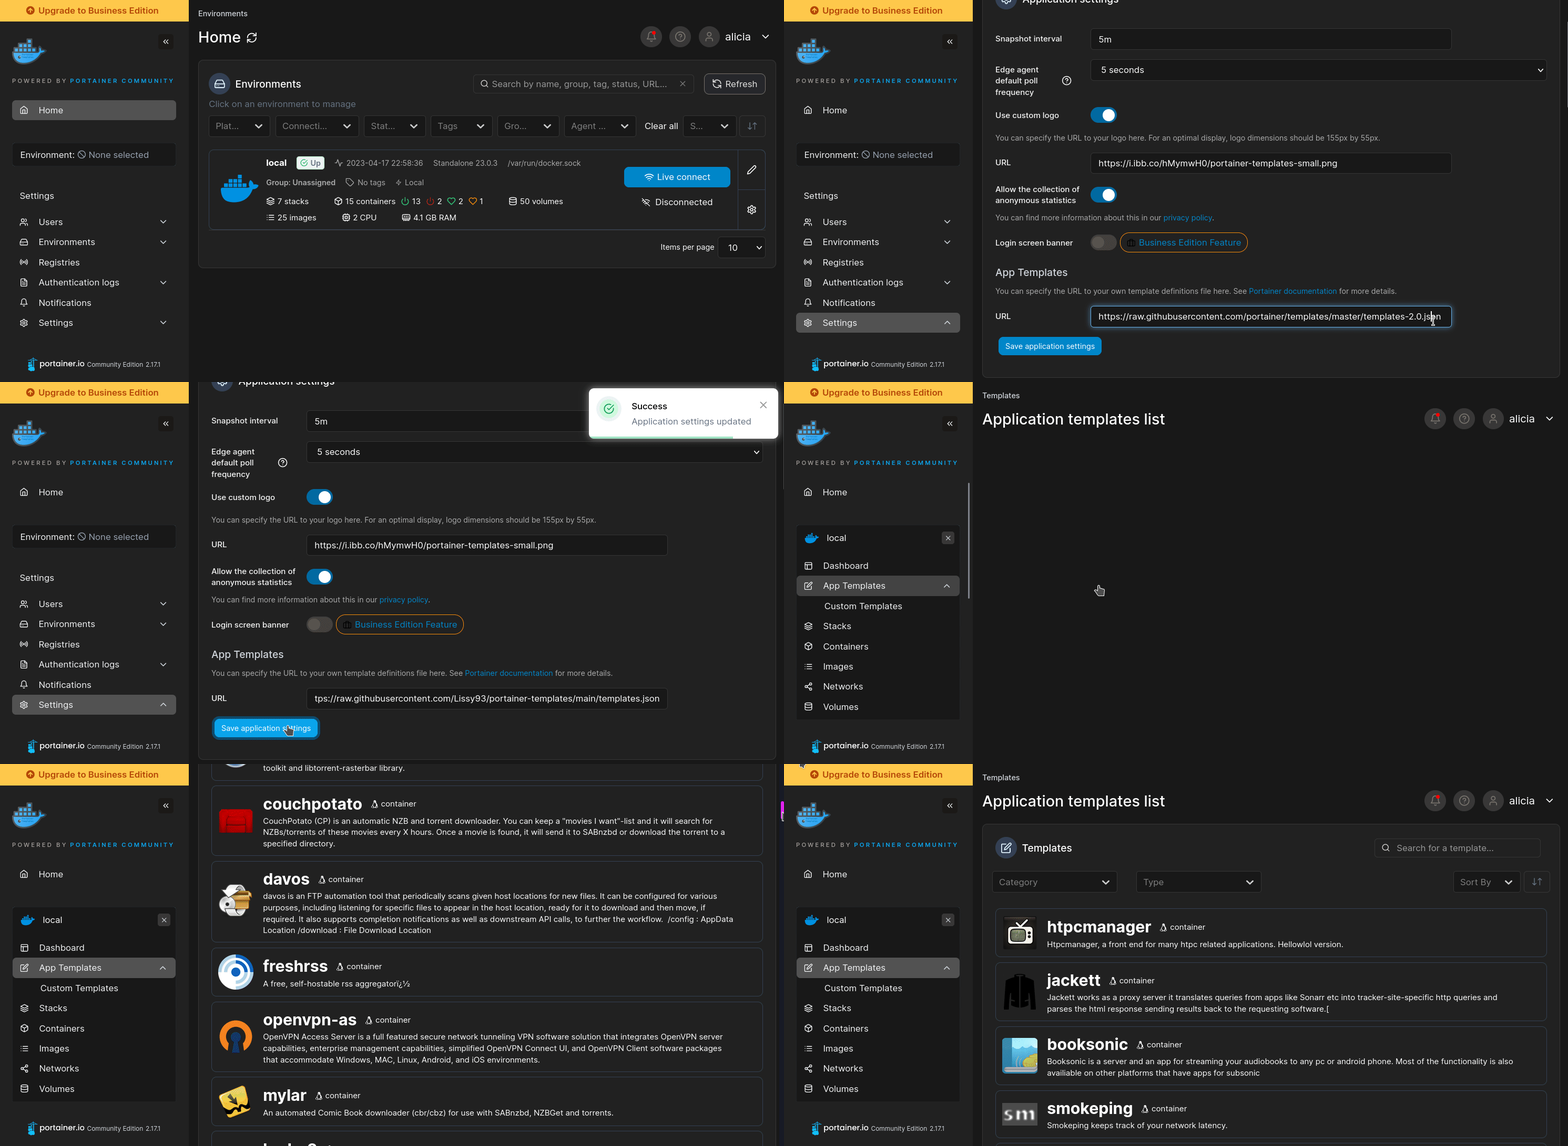
More install options in our documentation, or see Macleykun/pixel-server for app-specific guidance.
pixel-server
Wireless control of PixelStrips or NeoPixels using a web graphical interface running on a Raspberry Pi.Works with any Raspberry Pi. On older Raspberry Pi models (Raspberry Pi V1 or Raspberry Pi Zero) then it is recommended running in headless mode and without using a local web browser. For newer models that should not be necessary.
For more details see:

Colors
The color of the pixels depends upon your actual strip. In the default code then grey is set to a very low value to show a noticeable difference on my pixel strip. This may appear to be near to black on the screen, but shows fairly bright on the strip. The same problem occurs with lighter colors such as light green which may appear almost white on the pixel strip.Sequences
The sequences are defined in pixelseq.py. You can add your own for any additional sequences you would like. You will need to create the appropriate method and update SeqList.pixelsequences and PixelSeq.seqmethods.It's also possible to create other sequences using the built-in sequences with specific color sequences. In particular you can add black for any pixels that you would like tried turned off.
For example try a chaser with: Black; Black; White; White Grey; White; White; White; Grey; Black
Install
This is designed to run on a Raspberry Pi with PixelStrip / NeoPixels / WS2812B LEDs connected to a gpio pin. It is recommended that you use a voltage level-shifter. For more details see:To install the RPI ws281x library:
pip3 install rpi_ws281xTo install the Argon hash algorithm
sudo apt install python3-argon2To install the Flask CSRF protection
pip3 install Flask-WTFTo be able to run the tests
sudo apt install python3-pytestIt is recommended to install this program directly from git, which will allow for install of future updates. Note that updates will replace any custom sequences you have created. To provide support for different usernames I recommend installing into the /opt directory.
On a Raspberry Pi, open a terminal and enter the following commands:
cd /opt
sudo mkdir pixel-server
sudo chown $USER: pixel-server
git clone https://github.com/penguintutor/pixel-server.git pixel-server
Then to have it start automatically run the following:
sudo cp /opt/pixel-server/pixelserver.service /etc/systemd/system/
sudo chown root:root /etc/systemd/system/pixelserver.service
sudo chmod 644 /etc/systemd/system/pixelserver.service
Enable using:
sudo systemctl start pixelserver.service
sudo systemctl enable pixelserver.service
There is also a video providing a step-by-step guide to installing this on a Raspberry Pi. Installing Pixel Server on Raspberry Pi OS 64-bit
For more information see: Penguin Tutor guide to starting programs automatically on a Raspberry Pi
Security
The pixel server is designed to support varying levels of security depending upon your system requirements.If used on a private only network then it can be configured for network address authentication.
If allowing incoming connections from the Internet then it is recommended that user authentication is enabled and it is configured through SSL. The configuration below is based on using Nginx as a reverse proxy to provide HTTPS using a LetsEncrypt certificate.
Enable SSL (HTTPS)
This explains how you can use the Flask (development) server with https using Nginx as a reverse proxy. This uses a free security certificate from Let's Encrypt. This means that I am able to setup Nginx as a reverse proxy on my home server, which could be used to provide encrypted connections to different services.On Nginx reverse proxy
This does not have to be on the same server as pixel-server.First make sure your system is up-to-date
sudo apt update
sudo apt upgrade
sudo apt install nginx
sudo apt install certbot
sudo apt install python3-certbot-nginxadd new file in sites-available
ln -s to /etc/nginx/sites-enabledAdd the following in a location file (this assumes using /rpi1/ as the route for this particular server.
location /rpi1/ {
    proxy_set_header X-Real-IP $remote_addr;
    proxy_pass http://<pixelserver_address>/;
}
Request through certbot your SSL certificate:
sudo certbot --nginx -d <public hostname>This updates /etc/nginx/sites-enabled
Update with
sudo nginx -t
sudo nginx -s reload
Add the following to crontab for root:
0 12 * * * /usr/bin/certbot renew --quietThis checks for updates on a daily basis and if required renew
Login
New login features requires that users login to the web interface. This would prevent automation from working, therefore an alternative is allowed where clients can be pre-authorized based on their IP address. All admin functions need to be logged in as an admin user.If automation runs on the local machine then it is recommended that only the loopback IP address 127.0.0.1 is pre-authorized, but additional IP addresses can be enabled for use by WiFi switches, such as those used in the ESP32 wireless capacitive touch switch.
There are no users setup as default. Before you can login then you should create your first admin user with the following command:
python3 createadmin.py <username> <password> >> users.cfgThe angled brackets should not be included around the username or password. The double greater than symbols will append to the users.cfg file, so if the file already exists this will not remove any existing accounts. Ensure you don't end up with multiple users with the same username using this command. Instead once you have setup the initial user you should login through the web interface to configure additional users. It is recommended that you restart the server after creating the initial admin login, if not then you will continue to get warnings about having no users setup.
Docker install
If you wish to use this project in a container, you can do so by getting Docker first if you don't have it installed yet:curl -fsSL https://get.docker.com -o get-docker.sh
sudo sh get-docker.sh
sudo usermod -aG docker $USER
rm get-docker.sh
exit # logout and back in for changes to take effect!First we enable the needed interfaces by doing:
sudo raspi-config nonint do_spi 0
sudo raspi-config nonint do_i2c 0
ls /dev/i2c* /dev/spidev0.0
The above command should output:
/dev/i2c-1 /dev/i2c-20 /dev/i2c-21 /dev/spidev0.0Next we create a directory and the config files to keep them persistant:
sudo mkdir /opt/pixel-server/
sudo touch /opt/pixel-server/users.cfg
sudo sh -c "echo 'network_allow_auth = 0.0.0.0' > /opt/pixel-server/auth.cfg"
sudo wget https://raw.githubusercontent.com/penguintutor/pixel-server/main/defaults.cfg -O /opt/pixel-server/pixelserver.cfg
The above step only has to be done once, otherwise the content will be overwitten.
To run pixel-server with Docker, use the following command:
docker run -d -v /opt/pixel-server/auth.cfg:/opt/pixel-server/auth.cfg -v /opt/pixel-server/pixelserver.cfg:/opt/pixel-server/pixelserver.cfg -v /opt/pixel-server/users.cfg:/opt/pixel-server/users.cfg -v crontab:/etc/crontabs/ --device=/dev/vcio --cap-add=SYS_RAWIO --device=/dev/mem --security-opt=systempaths=unconfined --security-opt=apparmor=unconfined --device=/dev/spidev0.0 --device=/dev/i2c-1 --device=/dev/gpiomem --restart unless-stopped -p 80:80 --name pixel-server macley/pixel-serverThe above command will pull the required image in, make the config files persistant even if you delete the container and adds the minimum required devices/permissions inorder to function properly.
If you don't wish to use port 80, you can change:
-p 80:80 into -p 81:80.You won't be able to login yet, you can create a new user by doing:
docker exec -it pixel-server sh -c 'python3 createadmin.py <username> <password> >> users.cfg'
docker restart pixel-server
The pixel-server container is now running with the latest changes and you can always view them on
/opt/pixel-server/.If you wish to update the container when a new image is out, you can do it manually by using:
docker pull macley/pixel-server
docker stop pixel-server
docker rm pixel-server
You can then start the container with the run command.
If you wish to automate using crontab inside of the container. You can by doing:
docker exec -it pixel-server crontab -eContinue reading how to properly use crontab.
Automation
You can automate the light sequences being turned on and off by using crontab. For example:0 22 * * * wget -O /dev/null http://127.0.0.1/set?seq=alloff&delay=976&reverse=0&colors=ffffff
0 16 * * 1-5 wget -O /dev/null http://127.0.0.1/set?seq=chaser&delay=5000&reverse=1&colors=ffffff,ffffff,ffffff,0000ff,ffffff,ffffff,ffffff,00ffffToggle
An additional setting available for automation is &toggle=True. When turned on then the pixel output will toggle between the specified sequence and allOff.Cheerlights / Custom color
New custom color option. You can create (or use an external program) a file called customlight.cfg. This file should contain a single color or list of colors (one color per line). They should be in html RRGGBB color format, with or without a #. Any lines not recognised are ignored.To use in automation use the word "custom" in place of the RGB value in the URL string.
For best effect use either a single color in the customlight.cfg file, or the same number of custom entries as the number of custom LEDs selected.
Cheerlight automation
If you would like to have the lights automatically update to the latest cheerlight color then you can add the following line to crontab.*/5 * * * * wget -O /opt/pixel-server/customlight.cfg http://api.thingspeak.com/channels/1417/field/2/last.txtThe ~ assumes that this is installed in your home directory.
Configuration
The default configuration is in a file called defaults.cfg. You should not edit that file directly as it will be overwritten by future upgrades. Instead copy the relevant entries to a new file called pixelserver.cfg.The following parameters can be used:
- ledcount - Number of LEDs on your pixel strip
- gpiopin - GPIO pin number
- ledfreq - LED frequency (normally leave at default)
- leddma - LED DMA number (normally leave at default)
- ledchannel - LED channel number (normally leave at default)
- ledmaxbrighness - LED brightness (0 to 255)
- ledinvert - Set to True if an inverting buffer is used (otherwise False)
- striptype - Set to colour sequence or strip type
Valid strip types
The striptype can be set using a color sequence. For WS2811 / WS2812B strips then this should be three letters representing the order of the RGB colours eg. GRB for green, red then blue.For SK6812 strips then it should be four letters also including W for white. eg. GRBW for green, red, blue and then white.
Alternatively the strip type can be defined as one of the following values: WS2811STRIPRGB WS2811STRIPRBG WS2811STRIPGRB WS2811STRIPBGR WS2811STRIPBRG WS2811STRIPBGR WS2812STRIP SK6812STRIPRGBW SK6812STRIPRBGW SK6812STRIPGRBW SK6812STRIPGBRW SK6812STRIPBRGW SK6812STRIPBGRW SK6812STRIP SK6812WSTRIP
auth.cfg
Controls authentication. There is no auth.cfg by default, which results in all users needing to login, available from any network.Can have one or more of the following, which can be a single IP address, or a network subnet, multiple addresses or network subnets (comma seperated) or 0.0.0.0 (all addresses) Multiple entries will be appended to the access.
proxyserver = Any addresses in this range will be treated as proxy servers. If the proxy server has X-Real-IP set then that will be used instead of the local ip address of the server. Warning if that is not a proxy server then this could be a security risk (in terms of allowing non authenticated logins). Cannot be 0.0.0.0 (everywhere is a proxy doesn't make sense) - normally this will be specific IP address rather than range. If the attempt from the proxy server does not have X-RealIP then the address will be treated as coming from that IP address.
networkallowalways = Allways allow without login (useful for automation or local)
networkallowauth = Must always be a logged in user to change the light status normally this is 0.0.0.0 = allow all, but with authentication
Note that to perform any adminstration tasks then must be in either of the above - but must also be authenticated.
Example auth.cfg
For a typical authentication file which allows unauthenicated from the localhost and requires login from all other hosts then save the following into a file called auth.cfg# Authentication rules for Pixel Server
# Following addresses can access without authentication
network_allow_always = 127.0.0.1
# Following allowed, but need to authenticate
# 0.0.0.0 = all addresses
network_allow_auth = 0.0.0.0Updates and changes
This code is in development and may change in operation. Details of significant changes will be included here.Change log
August 2022 - v0.1.0
Authentication merged into main branch.July 2022
Authentication and logging enabled. This is a significant change which brings in additional security. Changes may be needed to user configuration files as well as generating a new user to administer the system.You may need to install additional libraries including the following commands:
sudo pip3 install rpi_ws281x
sudo apt install python3-argon2
sudo pip3 install Flask-WTF
May 2022
Additional color option of "Custom Color". This allows custom colors to be used through a custom.light.cfg file. This is particularly useful if you want to be able to control color using cheerlights or would like to provide your own home automation with non-volitile color changes.April 2022
When setting a sequence the server will now respond with a JSON formatted status replacing the previous single word "ready" or simple error message. This provides feedback on the status of the request as well as what sequence is currently being displayed.Upgrading to the latest version
If you installed the software using a git clone then you can update by issuing agit pull. Alternatively you can download the latest version overwriting your existing files manually.As long as you followed the instructions regarding using a custom configuration file, then your config will still be kept.
If upgrading from a version prior to September 2022 you may need to add the following pre-requisites if not already installed:
sudo apt install python3-argon2
sudo pip3 install Flask-WTF
Then you will need to create a login using the createadmin.py script explained under the install instructions.
python3 createadmin.py <username> <password> >> users.cfgYou may also need to create a new configuration file for auth.cfg
Development
Testing
Currently supports limited automated testing based around the authentication. This is achieved using:py.test-3Manual testing is required for all other functions.
Serve Pixel-server on your own domain behind Caddy, Nginx or Traefik. Fill in your domain and copy the result. It's a starting point, some apps need their own base URL or extra headers set too.
Proxying pixel-server.example.com to http://pixel-server:80
Add this to your Caddyfile
pixel-server.example.com {
	reverse_proxy http://pixel-server:80
}Check the logs first
Nine times out of ten the logs tell you exactly what went wrong.
- In Portainer, go to Containers, click the container, then Logs. Or run
docker logs pixel-server - Exit codes help too:
137means killed, usually out of memory.126or127means the command inside the image is broken.
Port already in use
If deployment fails with "Bind for 0.0.0.0:85 failed: port is already allocated", something else on your server is using that port.
- Find what's using it:
sudo ss -tlnp | grep :85 - Stop the other service, or pick a different host port. In
85:80only the left number is yours to change, the right one belongs to the app.
Running but the page won't load
The container is up but nothing appears in your browser.
- Use your server's real IP:
http://your-server-ip:85. The 0.0.0.0 link Portainer shows isn't a real address. - Give it a minute after first deploy, pixel-server can take a while to initialise.
- Make sure your firewall allows the port, e.g.
sudo ufw allow 85
Permission denied on volumes
If the logs show "permission denied", the app can't write to its data folder on the host.
- Fix the ownership:
sudo chown -R 1000:1000 /portainer/Files/AppData/Config/pixel-server/auth.cfg(and the same for the other mapped folders)
Image won't pull
Test the pull directly on the host: docker pull macley/pixel-server:latest
- "manifest unknown" means the tag no longer exists. This template uses
latest, so try pinning a specific version instead. - "toomanyrequests" is the Docker Hub rate limit. Log in with
docker loginto raise it. - "no space left on device" means a full disk. Reclaim space with
docker system prune
"exec format error"
This means the image was built for a different CPU architecture than your server.
- This image supports:
amd64, arm64, arm/v7 - Check yours with
uname -m: x86_64 is amd64, aarch64 is arm64. Raspberry Pi and other ARM boards are the usual culprits.
Container keeps restarting
The unless-stopped restart policy relaunches the app after every crash, so the real error can scroll past.
- Check the logs right after a restart, the last few lines before it died are the useful ones.
- Get the exit code with
docker inspect pixel-server --format '{{.State.ExitCode}}' - Still stuck? Redeploy once with the restart policy set to
noso the failure stays visible.
Privileged mode
This template runs the container in privileged mode, giving it full access to your host.
- Only deploy it if you trust the app.
- If deployment is blocked, your Portainer security settings or hardened host may not allow privileged containers.
Raise an issue
Found something which isn't working as it should? Here's how to report it.
- Bug within the app: Open an issue on Macleykun/pixel-server
- Template not working: Open an issue on novaspirit/pi-hosted
- This website not working: Open an issue on lissy93/portainer-templates
A single container
Pixel-server runs as one container, the simplest kind of app here. Just the one image to pull and nothing else wired up alongside it.
The app image
An image is the app packed up ready to go, everything Pixel-server needs bundled into one download. This template pulls macley/pixel-server:latest, which Docker fetches once (about 113 MB) and then starts your own copy from.
Where the image comes from
Docker pulls its images from registries, public libraries of ready-built apps. Pixel-server's comes from Docker Hub, published by macley.
Version tags
The bit after the colon in the image name is the version tag. Here it's latest, which always points at the newest build, so a redeploy can bump you to a newer release without you asking. Pin a specific tag if you would rather stay on one version.
Which machines it runs on
Every image is built for particular CPU types. This one ships for amd64, arm64, arm/v7, so it runs on both regular x86 servers and ARM boards like a Raspberry Pi.
Ports
A port is the door the app answers on. A mapping like 85:80 means it's reachable on port 85 of your server, where the left number is yours to change and the right one belongs to the app. Once it's running, open http://your-server-ip:85 in a browser. It opens:
85:80, likely the web interface
Volumes
A volume is where Pixel-server keeps its files so they survive an update or a restart. Without one, anything it saves would sit inside the container and vanish the moment it's recreated. This template mounts:
/opt/pixel-server/auth.cfgfrom/portainer/Files/AppData/Config/pixel-server/auth.cfgon the host/opt/pixel-server/pixelserver.cfgfrom/portainer/Files/AppData/Config/pixel-server/pixelserver.cfgon the host/opt/pixel-server/users.cfgfrom/portainer/Files/AppData/Config/pixel-server/users.cfgon the host/etc/crontabs/as a volume Docker manages for you
Restart policy
The restart policy here is unless-stopped, so Docker restarts Pixel-server after a crash or reboot, but leaves it off when you stop it on purpose. You can change this on the deploy screen. The choices are no (never restart), on-failure (only after a crash), unless-stopped (restart unless you stop it), and always (bring it back no matter what).
Networking
Nothing custom is set, so Pixel-server sits on Docker's default bridge network: its own private space that reaches the outside world only through the ports it publishes.
Container name
Once it's deployed, Portainer names the container pixel-server. That's what you'll spot in the containers list and use in commands like docker logs pixel-server.
Privileged mode
This template runs Pixel-server in privileged mode, which gives it nearly as much access to your server as the system itself. Some apps genuinely need it to reach hardware or manage the host, so it's one to run only if you trust the source.
Platform
The platform is linux, the kind of system the container is built to run on. Docker and Portainer handle this on a normal Linux server.
Open source license
Pixel-server is open source, released under the GPL-3.0 license. In plain terms the code is out in the open, so you're free to run it and change it to fit what you need.
Portainer app templates
Zooming out, this whole page comes from a Portainer app template: a short recipe telling Portainer how to set Pixel-server up. Add the template list to Portainer once, then deploying Pixel-server is a click rather than a wall of config.