
![CyberChef]() CyberChef
CyberChef
Container
Web app for encoding, decoding, encrypting, compressing and picking apart data, by chaining hundreds of small operations into a recipe. Source: https://github.com/gchq/CyberChef
Image details
Source details
Configuration
TypeContainerlinuxghcr.io/gchq/cyberchef:118088:8080/tcpunless-stoppedTemplate by NotAFlightRisk
Report issueNotes
http://<your-host>:8088. There's no login and nothing to back up, since every recipe runs in your browser and your data never reaches the server. Recipes live in the URL, so bookmark or share that to keep one. Docs: github.com/gchq/CyberChef/wikiStandalone Install
Select an install method, to see config/commands for deploying CyberChef
Install on Portainer
Import all app templates into your Portainer instance, for easy 1-click deploys
- Ensure both Docker and Portainer are installed, and up-to-date
- Log into your Portainer web UI
- Under Settings → App Templates, paste the below URL
- Head to Home → App Templates, and the list of apps will show up
- Select CyberChef, fill in any config options, and hit Deploy
Template Import URL
https://raw.githubusercontent.com/Lissy93/portainer-templates/main/templates.json
Show Me
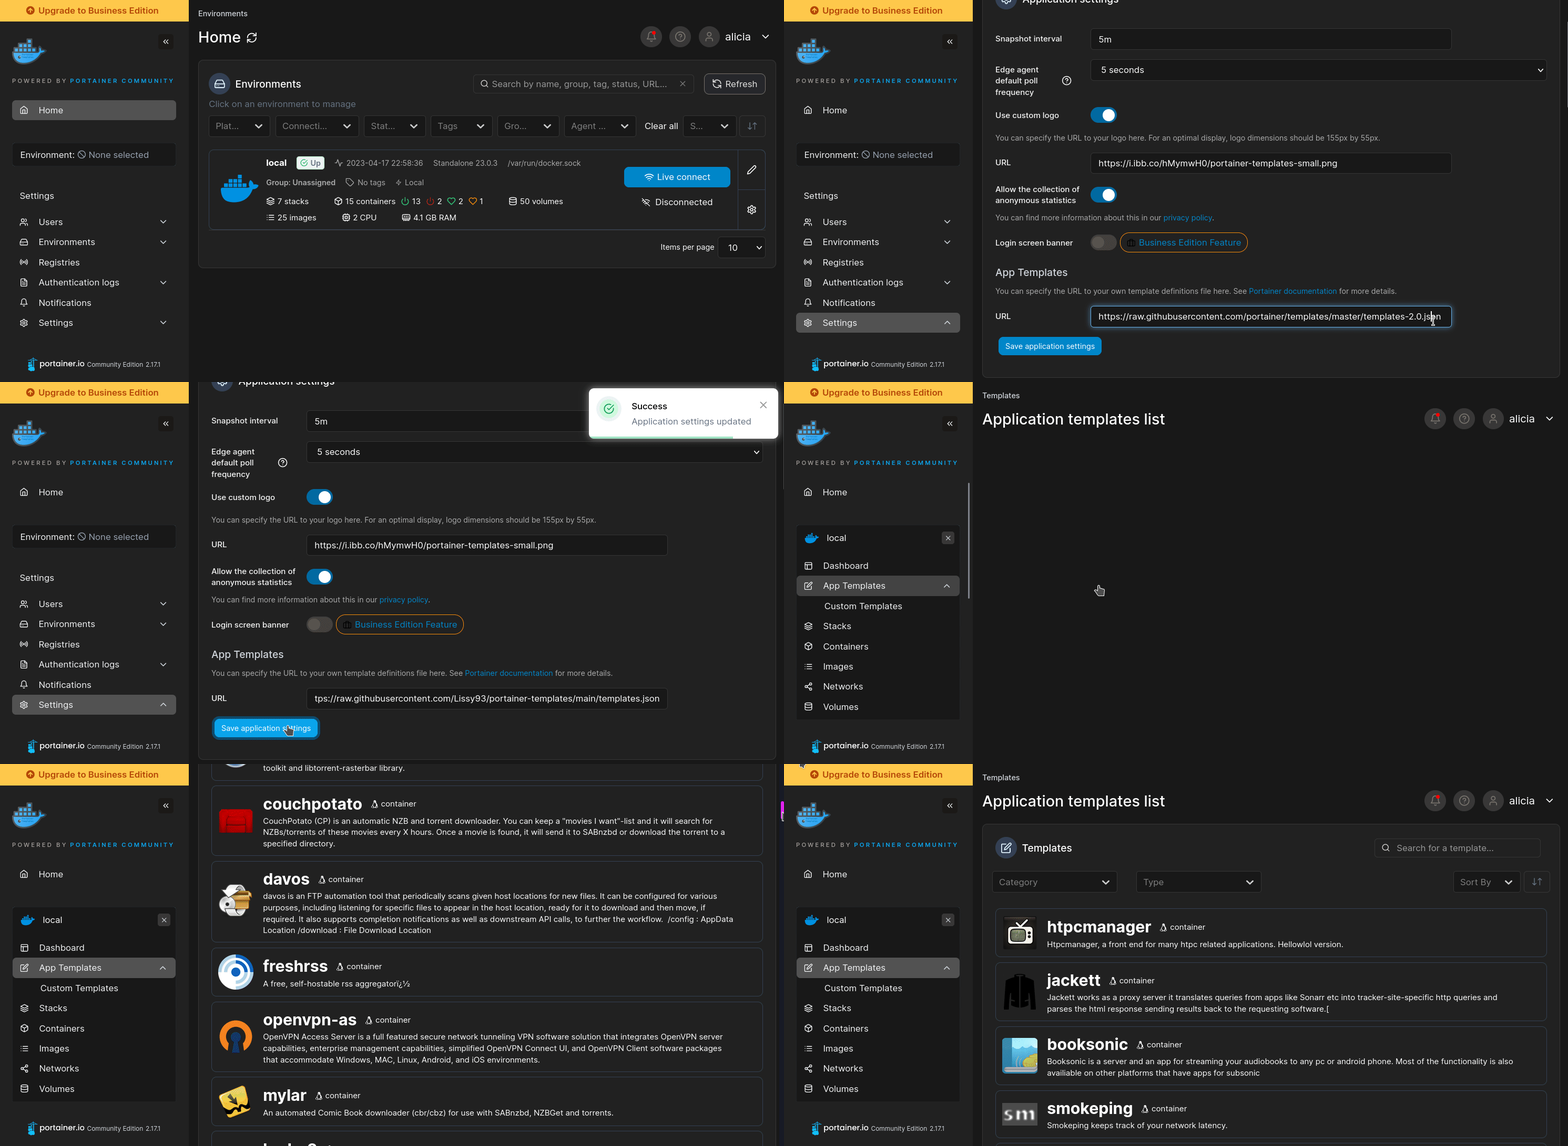
More install options in our documentation, or see gchq/CyberChef for app-specific guidance.
CyberChef




The Cyber Swiss Army Knife
CyberChef is a simple, intuitive web app for carrying out all manner of "cyber" operations within a web browser. These operations include simple encoding like XOR and Base64, more complex encryption like AES, DES and Blowfish, creating binary and hexdumps, compression and decompression of data, calculating hashes and checksums, IPv6 and X.509 parsing, changing character encodings, and much more.The tool is designed to enable both technical and non-technical analysts to manipulate data in complex ways without having to deal with complex tools or algorithms. It was conceived, designed, built and incrementally improved by an analyst in their 10% innovation time over several years.
Contents
- With Docker - From sourceOfficial website
CyberChef's official website can be found here1 - have fun!Running Locally
You can run CyberChef with Docker (no toolchain required) or build it from source with Node.js.With Docker
Prerequisites- Docker Desktop must be open and running on your machine
Option 1: Build the Docker Image Yourself
- Build the docker image
docker build --tag cyberchef --ulimit nofile=10000 .- Run the docker container
docker run -it -p 8080:8080 cyberchef- Navigate to
http://localhost:8080in your browser
Option 2: Use the pre-built Docker Image
If you prefer to skip the build process, you can use the pre-built imagedocker run -it -p 8080:8080 ghcr.io/gchq/cyberchef:latestJust like before, navigate to
http://localhost:8080 in your browser.This image is built and published through our GitHub Workflows.
From source
If you want to develop CyberChef or run it without Docker, you can build it directly with Node.js.Prerequisites
- Node.js
v24(see Node.js support)
!NOTE
You can use nvm to manage Node.js versions and use the current development version in this project to avoid conflicts with other projects on your machine.
Setup
git clone https://github.com/gchq/CyberChef.git
cd CyberChef
npm install
Common tasks
| Command | Description |
|---|---|
npm start | Run the development server with live reload at http://localhost:8080. |
npm run build | Produce a production build in the build/prod directory. |
npm test | Run the Node.js and operation test suites. |
npm run testui | Run the browser (UI) tests. |
npm run lint | Check the code against the linting rules. |
npm run newop | Scaffold a new operation via the interactive quickstart script. |
If you hit an out-of-memory error while building large recipes, increase Node's heap size with
npm run setheapsize.How it works
There are four main areas in CyberChef:1. The input box in the top right, where you can paste, type or drag the text or file you want to operate on. 2. The output box in the bottom right, where the outcome of your processing will be displayed. 3. The operations list on the far left, where you can find all the operations that CyberChef is capable of in categorised lists, or by searching. 4. The recipe area in the middle, where you can drag the operations that you want to use and specify arguments and options.
You can use as many operations as you like in simple or complex ways. Some examples are as follows:
- Decode a Base64-encoded string2 - Convert a date and time to a different time zone3 - Parse a Teredo IPv6 address4 - Convert data from a hexdump, then decompress5 - Decrypt and disassemble shellcode6 - Display multiple timestamps as full dates7 - Carry out different operations on data of different types8 - Use parts of the input as arguments to operations9 - Perform AES decryption, extracting the IV from the beginning of the cipher stream10 - A simpler way to perform the same AES Decryption13 - Automagically detect several layers of nested encoding12
Features
- Drag and drop- Operations can be dragged in and out of the recipe list, or reorganised.
- Files up to 2GB can be dragged over the input box to load them directly into the browser.- Whenever you modify the input or the recipe, CyberChef will automatically "bake" for you and produce the output immediately.
- This can be turned off and operated manually if it is affecting performance (if the input is very large, for instance).- CyberChef uses [a number of techniques](https://github.com/gchq/CyberChef/wiki/Automatic-detection-of-encoded-data-using-CyberChef-Magic) to attempt to automatically detect which encodings your data is under. If it finds a suitable operation that make sense of your data, it displays the 'magic' icon in the Output field which you can click to decode your data.- You can set breakpoints on any operation in your recipe to pause execution before running it.
- You can also step through the recipe one operation at a time to see what the data looks like at each stage.- If you come up with an awesome recipe that you know you’ll want to use again, just click "Save recipe" and add it to your local storage. It'll be waiting for you next time you visit CyberChef.
- You can also copy the URL, which includes your recipe and input, to easily share it with others.- If you know the name of the operation you want or a word associated with it, start typing it into the search field and any matching operations will immediately be shown.- When you highlight text in the input or output, the offset and length values will be displayed and, if possible, the corresponding data will be highlighted in the output or input respectively (example: [highlight the word 'question' in the input to see where it appears in the output][11]).- You can save the output to a file at any time or load a file by dragging and dropping it into the input field. Files up to around 2GB are supported (depending on your browser), however, some operations may take a very long time to run over this much data.- It should be noted that none of your recipe configuration or input (either text or files) is ever sent to the CyberChef web server - all processing is carried out within your browser, on your own computer.
- Due to this feature, CyberChef can be downloaded and run locally. You can use the link in the top left corner of the app to download a full copy of CyberChef and drop it into a virtual machine, share it with other people, or host it in a closed network.Deep linking
By manipulating CyberChef's URL hash, you can change the initial settings with which the page opens. The format ishttps://gchq.github.io/CyberChef/#recipe=Operation()&input=...Supported arguments are
recipe, input (encoded in Base64), and theme.Browser support
CyberChef is built to support- Google Chrome 50+ - Mozilla Firefox 38+
Node.js support
CyberChef is built to fully support Node.jsv24 and is also tested against Node.js v26 ahead of it becoming the active LTS release. For more information, see the "Node API" wiki pageSecurity
Please see the CyberChef security policy.Contributing
Contributing a new operation to CyberChef is super easy! The quickstart script will walk you through the process. If you can write basic JavaScript, you can write a CyberChef operation.An installation walkthrough, how-to guides for adding new operations and themes, descriptions of the repository structure, available data types and coding conventions can all be found in the "Contributing" wiki page.
- Push your changes to your fork. - Submit a pull request. If you are doing this for the first time, you will be prompted to sign the GCHQ Contributor Licence Agreement via the CLA assistant on the pull request. This will also ask whether you are happy for GCHQ to contact you about a token of thanks for your contribution, or about job opportunities at GCHQ.
Licencing
CyberChef is released under the Apache 2.0 Licence and is covered by Crown Copyright.1: https://gchq.github.io/CyberChef 2: https://gchq.github.io/CyberChef/#recipe=FromBase64('A-Za-z0-9%2B/%3D',true)&input=VTI4Z2JHOXVaeUJoYm1RZ2RHaGhibXR6SUdadmNpQmhiR3dnZEdobElHWnBjMmd1 3: https://gchq.github.io/CyberChef/#recipe=TranslateDateTimeFormat('Standard%20date%20and%20time','DD/MM/YYYY%20HH:mm:ss','UTC','dddd%20Do%20MMMM%20YYYY%20HH:mm:ss%20Z%20z','Australia/Queensland')&input=MTUvMDYvMjAxNSAyMDo0NTowMA 4: https://gchq.github.io/CyberChef/#recipe=ParseIPv6address()&input=MjAwMTowMDAwOjQxMzY6ZTM3ODo4MDAwOjYzYmY6M2ZmZjpmZGQy 5: https://gchq.github.io/CyberChef/#recipe=FromHexdump()Gunzip()&input=MDAwMDAwMDAgIDFmIDhiIDA4IDAwIDEyIGJjIGYzIDU3IDAwIGZmIDBkIGM3IGMxIDA5IDAwIDIwICB8Li4uLi6881cu/y7HwS4uIHwKMDAwMDAwMTAgIDA4IDA1IGQwIDU1IGZlIDA0IDJkIGQzIDA0IDFmIGNhIDhjIDQ0IDIxIDViIGZmICB8Li7QVf4uLdMuLsouRCFb/3wKMDAwMDAwMjAgIDYwIGM3IGQ3IDAzIDE2IGJlIDQwIDFmIDc4IDRhIDNmIDA5IDg5IDBiIDlhIDdkICB8YMfXLi6%2BQC54Sj8uLi4ufXwKMDAwMDAwMzAgIDRlIGM4IDRlIDZkIDA1IDFlIDAxIDhiIDRjIDI0IDAwIDAwIDAwICAgICAgICAgICB8TshObS4uLi5MJC4uLnw 6: https://gchq.github.io/CyberChef/#recipe=RC4(%7B'option':'UTF8','string':'secret'%7D,'Hex','Hex')Disassemblex86('64','Full%20x86%20architecture',16,0,true,true)&input=MjFkZGQyNTQwMTYwZWU2NWZlMDc3NzEwM2YyYTM5ZmJlNWJjYjZhYTBhYWJkNDE0ZjkwYzZjYWY1MzEyNzU0YWY3NzRiNzZiM2JiY2QxOTNjYjNkZGZkYmM1YTI2NTMzYTY4NmI1OWI4ZmVkNGQzODBkNDc0NDIwMWFlYzIwNDA1MDcxMzhlMmZlMmIzOTUwNDQ2ZGIzMWQyYmM2MjliZTRkM2YyZWIwMDQzYzI5M2Q3YTVkMjk2MmMwMGZlNmRhMzAwNzJkOGM1YTZiNGZlN2Q4NTlhMDQwZWVhZjI5OTczMzYzMDJmNWEwZWMxOQ 7: https://gchq.github.io/CyberChef/#recipe=Fork('%5C%5Cn','%5C%5Cn',false)FromUNIXTimestamp('Seconds%20(s)')&input=OTc4MzQ2ODAwCjEwMTI2NTEyMDAKMTA0NjY5NjQwMAoxMDgxMDg3MjAwCjExMTUzMDUyMDAKMTE0OTYwOTYwMA 8: https://gchq.github.io/CyberChef/#recipe=Fork('%5C%5Cn','%5C%5Cn',false)ConditionalJump('1',false,'base64',10)ToHex('Space')Return()Label('base64')ToBase64('A-Za-z0-9%2B/%3D')&input=U29tZSBkYXRhIHdpdGggYSAxIGluIGl0ClNvbWUgZGF0YSB3aXRoIGEgMiBpbiBpdA 9: https://gchq.github.io/CyberChef/#recipe=Register('key%3D(%5B%5C%5Cda-f%5D)',true,false)Find/Replace(%7B'option':'Regex','string':'.data%3D(.)'%7D,'$1',true,false,true)RC4(%7B'option':'Hex','string':'$R0'%7D,'Hex','Latin1')&input=aHR0cDovL21hbHdhcmV6LmJpei9iZWFjb24ucGhwP2tleT0wZTkzMmE1YyZkYXRhPThkYjdkNWViZTM4NjYzYTU0ZWNiYjMzNGUzZGIxMQ 10: https://gchq.github.io/CyberChef/#recipe=Register('(.%7B32%7D)',true,false,false)Dropbytes(0,32,false)AESDecrypt(%7B'option':'Hex','string':'1748e7179bd56570d51fa4ba287cc3e5'%7D,%7B'option':'Hex','string':'$R0'%7D,16,'CTR','Hex','Raw',%7B'option':'Hex','string':''%7D,%7B'option':'Hex','string':''%7D,'Off')&input=NTFlMjAxZDQ2MzY5OGVmNWY3MTdmNzFmNWI0NzEyYWYyMGJlNjc0YjNiZmY1M2QzODU0NjM5NmVlNjFkYWFjNDkwOGUzMTljYTNmY2Y3MDg5YmZiNmIzOGVhOTllNzgxZDI2ZTU3N2JhOWRkNmYzMTFhMzk0MjBiODk3OGU5MzAxNGIwNDJkNDQ3MjZjYWVkZjU0MzZlYWY2NTI0MjljMGRmOTRiNTIxNjc2YzdjMmNlODEyMDk3YzI3NzI3M2M3YzcyY2Q4OWFlYzhkOWZiNGEyNzU4NmNjZjZhYTBhZWUyMjRjMzRiYTNiZmRmN2FlYjFkZGQ0Nzc2MjJiOTFlNzJjOWU3MDlhYjYwZjhkYWY3MzFlYzBjYzg1Y2UwZjc0NmZmMTU1NGE1YTNlYzI5MWNhNDBmOWU2MjlhODcyNTkyZDk4OGZkZDgzNDUzNGFiYTc5YzFhZDE2NzY3NjlhN2MwMTBiZjA0NzM5ZWNkYjY1ZDk1MzAyMzcxZDYyOWQ5ZTM3ZTdiNGEzNjFkYTQ2OGYxZWQ1MzU4OTIyZDJlYTc1MmRkMTFjMzY2ZjMwMTdiMTRhYTAxMWQyYWYwM2M0NGY5NTU3OTA5OGExNWUzY2Y5YjQ0ODZmOGZmZTljMjM5ZjM0ZGU3MTUxZjZjYTY1MDBmZTRiODUwYzNmMWMwMmU4MDFjYWYzYTI0NDY0NjE0ZTQyODAxNjE1YjhmZmFhMDdhYzgyNTE0OTNmZmRhN2RlNWRkZjMzNjg4ODBjMmI5NWIwMzBmNDFmOGYxNTA2NmFkZDA3MWE2NmNmNjBlNWY0NmYzYTIzMGQzOTdiNjUyOTYzYTIxYTUzZg 11: https://gchq.github.io/CyberChef/#recipe=XOR(%7B'option':'Hex','string':'3a'%7D,'Standard',false)ToHexdump(16,false,false)&input=VGhlIGFuc3dlciB0byB0aGUgdWx0aW1hdGUgcXVlc3Rpb24gb2YgbGlmZSwgdGhlIFVuaXZlcnNlLCBhbmQgZXZlcnl0aGluZyBpcyA0Mi4 12: https://gchq.github.io/CyberChef/#recipe=Magic(3,false,false)&input=V1VhZ3dzaWFlNm1QOGdOdENDTFVGcENwQ0IyNlJtQkRvREQ4UGFjZEFtekF6QlZqa0syUXN0RlhhS2hwQzZpVVM3UkhxWHJKdEZpc29SU2dvSjR3aGptMWFybTg2NHFhTnE0UmNmVW1MSHJjc0FhWmM1VFhDWWlmTmRnUzgzZ0RlZWpHWDQ2Z2FpTXl1QlY2RXNrSHQxc2NnSjg4eDJ0TlNvdFFEd2JHWTFtbUNvYjJBUkdGdkNLWU5xaU45aXBNcTFaVTFtZ2tkYk51R2NiNzZhUnRZV2hDR1VjOGc5M1VKdWRoYjhodHNoZVpud1RwZ3FoeDgzU1ZKU1pYTVhVakpUMnptcEM3dVhXdHVtcW9rYmRTaTg4WXRrV0RBYzFUb291aDJvSDRENGRkbU5LSldVRHBNd21uZ1VtSzE0eHdtb21jY1BRRTloTTE3MkFQblNxd3hkS1ExNzJSa2NBc3lzbm1qNWdHdFJtVk5OaDJzMzU5d3I2bVMyUVJQ 13: https://gchq.github.io/CyberChef/#recipe=AESDecrypt(%7B'option':'Hex','string':'1748e7179bd56570d51fa4ba287cc3e5'%7D,%7B'option':'Hex','string':'$R0'%7D,16,'CTR','Hex','Raw',%7B'option':'Hex','string':''%7D,%7B'option':'Hex','string':''%7D,'From%20start')&input=NTFlMjAxZDQ2MzY5OGVmNWY3MTdmNzFmNWI0NzEyYWYyMGJlNjc0YjNiZmY1M2QzODU0NjM5NmVlNjFkYWFjNDkwOGUzMTljYTNmY2Y3MDg5YmZiNmIzOGVhOTllNzgxZDI2ZTU3N2JhOWRkNmYzMTFhMzk0MjBiODk3OGU5MzAxNGIwNDJkNDQ3MjZjYWVkZjU0MzZlYWY2NTI0MjljMGRmOTRiNTIxNjc2YzdjMmNlODEyMDk3YzI3NzI3M2M3YzcyY2Q4OWFlYzhkOWZiNGEyNzU4NmNjZjZhYTBhZWUyMjRjMzRiYTNiZmRmN2FlYjFkZGQ0Nzc2MjJiOTFlNzJjOWU3MDlhYjYwZjhkYWY3MzFlYzBjYzg1Y2UwZjc0NmZmMTU1NGE1YTNlYzI5MWNhNDBmOWU2MjlhODcyNTkyZDk4OGZkZDgzNDUzNGFiYTc5YzFhZDE2NzY3NjlhN2MwMTBiZjA0NzM5ZWNkYjY1ZDk1MzAyMzcxZDYyOWQ5ZTM3ZTdiNGEzNjFkYTQ2OGYxZWQ1MzU4OTIyZDJlYTc1MmRkMTFjMzY2ZjMwMTdiMTRhYTAxMWQyYWYwM2M0NGY5NTU3OTA5OGExNWUzY2Y5YjQ0ODZmOGZmZTljMjM5ZjM0ZGU3MTUxZjZjYTY1MDBmZTRiODUwYzNmMWMwMmU4MDFjYWYzYTI0NDY0NjE0ZTQyODAxNjE1YjhmZmFhMDdhYzgyNTE0OTNmZmRhN2RlNWRkZjMzNjg4ODBjMmI5NWIwMzBmNDFmOGYxNTA2NmFkZDA3MWE2NmNmNjBlNWY0NmYzYTIzMGQzOTdiNjUyOTYzYTIxYTUzZg
Serve CyberChef on your own domain behind Caddy, Nginx or Traefik. Fill in your domain and copy the result. It's a starting point, some apps need their own base URL or extra headers set too.
Proxying cyberchef.example.com to http://cyberchef:8080
Add this to your Caddyfile
cyberchef.example.com {
	reverse_proxy http://cyberchef:8080
}Check the logs first
Nine times out of ten the logs tell you exactly what went wrong.
- In Portainer, go to Containers, click the container, then Logs. Or run
docker logs cyberchef - Exit codes help too:
137means killed, usually out of memory.126or127means the command inside the image is broken.
Port already in use
If deployment fails with "Bind for 0.0.0.0:8088 failed: port is already allocated", something else on your server is using that port.
- Find what's using it:
sudo ss -tlnp | grep :8088 - Stop the other service, or pick a different host port. In
8088:8080only the left number is yours to change, the right one belongs to the app.
Running but the page won't load
The container is up but nothing appears in your browser.
- Use your server's real IP:
http://your-server-ip:8088. The 0.0.0.0 link Portainer shows isn't a real address. - Give it a minute after first deploy, cyberchef can take a while to initialise.
- Make sure your firewall allows the port, e.g.
sudo ufw allow 8088
Image won't pull
Test the pull directly on the host: docker pull ghcr.io/gchq/cyberchef:11
- "manifest unknown" means the tag no longer exists.
- "toomanyrequests" is the Docker Hub rate limit. Log in with
docker loginto raise it. - "no space left on device" means a full disk. Reclaim space with
docker system prune
"exec format error"
This means the image was built for a different CPU architecture than your server.
- This image supports:
amd64, arm64, arm/v7 - Check yours with
uname -m: x86_64 is amd64, aarch64 is arm64. Raspberry Pi and other ARM boards are the usual culprits.
Container keeps restarting
The unless-stopped restart policy relaunches the app after every crash, so the real error can scroll past.
- Check the logs right after a restart, the last few lines before it died are the useful ones.
- Get the exit code with
docker inspect cyberchef --format '{{.State.ExitCode}}' - Still stuck? Redeploy once with the restart policy set to
noso the failure stays visible.
Data disappears when the container is recreated
This template doesn't define any volumes, so everything cyberchef saves lives inside the container and is lost on update or recreate.
- Add a volume mapping for cyberchef's data folder before storing anything you care about.
Raise an issue
Found something which isn't working as it should? Here's how to report it.
- Bug within the app: Open an issue on gchq/CyberChef
- Template not working: Open an issue on NotAFlightRisk/portainer-templates-extras
- This website not working: Open an issue on lissy93/portainer-templates
A single container
CyberChef runs as one container, the simplest kind of app here. Just the one image to pull and nothing else wired up alongside it.
The app image
An image is the app packed up ready to go, everything CyberChef needs bundled into one download. This template pulls ghcr.io/gchq/cyberchef:11, which Docker fetches once (about 115 MB) and then starts your own copy from.
Where the image comes from
Docker pulls its images from registries, public libraries of ready-built apps. CyberChef's comes from the GitHub Container Registry, published by gchq.
Version tags
The bit after the colon in the image name is the version tag. This one pins 11, so every redeploy gives you that exact build until you bump it yourself.
Which machines it runs on
Every image is built for particular CPU types. This one ships for amd64, arm64, arm/v7, so it runs on both regular x86 servers and ARM boards like a Raspberry Pi.
Ports
A port is the door the app answers on. A mapping like 8088:8080 means it's reachable on port 8088 of your server, where the left number is yours to change and the right one belongs to the app. Once it's running, open http://your-server-ip:8088 in a browser. It opens:
8088:8080, likely the web interface
No stored data
This template doesn't mount any storage, so whatever CyberChef writes stays inside the container and is wiped if it's recreated or updated. That's fine for something stateless, but add a volume before trusting it with anything you want to keep.
Restart policy
The restart policy here is unless-stopped, so Docker restarts CyberChef after a crash or reboot, but leaves it off when you stop it on purpose. You can change this on the deploy screen. The choices are no (never restart), on-failure (only after a crash), unless-stopped (restart unless you stop it), and always (bring it back no matter what).
Networking
Nothing custom is set, so CyberChef sits on Docker's default bridge network: its own private space that reaches the outside world only through the ports it publishes.
Container name
Once it's deployed, Portainer names the container cyberchef. That's what you'll spot in the containers list and use in commands like docker logs cyberchef.
Platform
The platform is linux, the kind of system the container is built to run on. Docker and Portainer handle this on a normal Linux server.
Open source license
CyberChef is open source, released under the Apache-2.0 license. In plain terms the code is out in the open, so you're free to run it and change it to fit what you need.
Portainer app templates
Zooming out, this whole page comes from a Portainer app template: a short recipe telling Portainer how to set CyberChef up. Add the template list to Portainer once, then deploying CyberChef is a click rather than a wall of config.