Portainer Templates logo

Portainer Templates

SORBA SDE SORBA SDE

edge

The SORBA Smart Data Engine (SDE) is an industrial data collection/gateway device capable of Advanced Edge Analytics & Machine Learning Edge Processing. SORBA-SDE is equipped with multiple communication driver/protocol applicable to the industrial market. The SORBA-SDE is a sensor/hardware agnostic device that serves as your point & click gateway capable of talking to multiple devices in real-time. The SDE provides easy access to equipment for troubleshooting and remote programming support for PLCs & HMIs utilizing a hassle-free easy, set-up approach to your assets.

Image details

Pulls: 25.7k
Architectures: amd64
Image size: 8.6 GB
Latest: 10.7.6
User: sorbotics
Created: Dec 21, 2023
Updated: 12 days ago
Status: active

Configuration

Type
Compose
Platform
linux
Image
sorbotics/sorba-sde:latest
Ports
443:443/tcp502:502/tcp1883:1883/tcp49321:49321/tcp
Volumes
/opt : sde-volume
Restart
always
Source

Template by portainer·Source

Installation

  1. Ensure both Docker and Portainer are installed, and up-to-date
  2. Log into your Portainer web UI
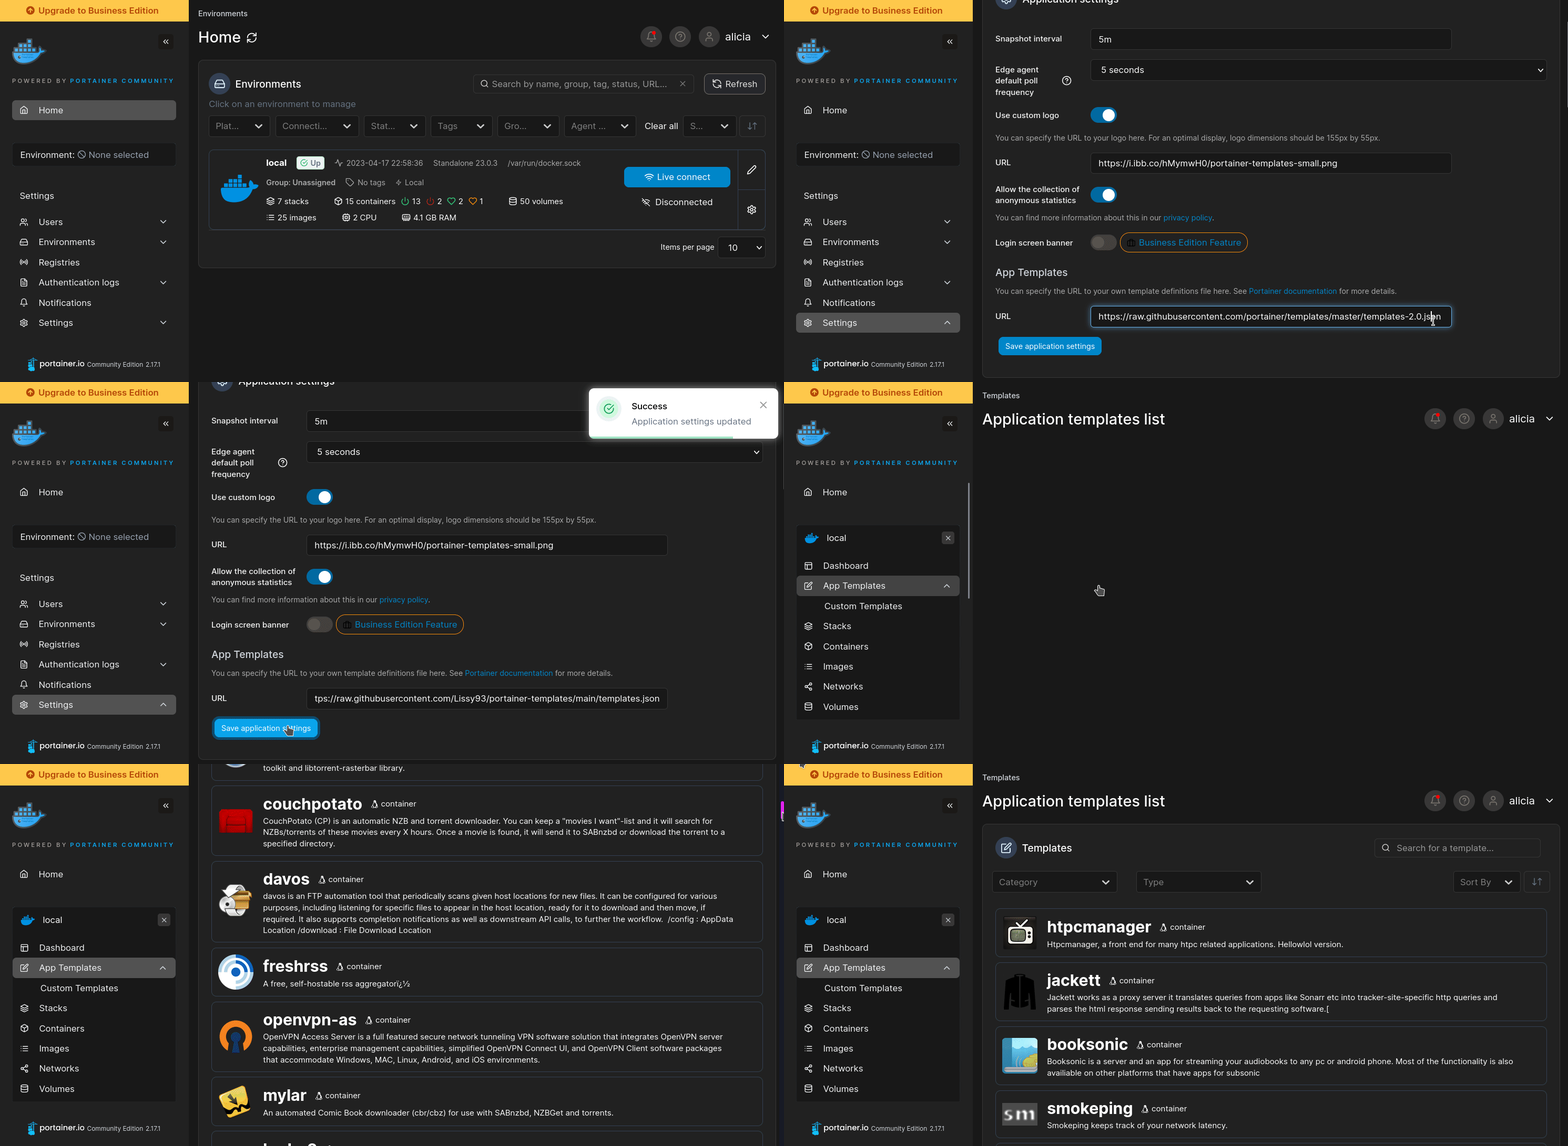
  3. Under Settings → App Templates, paste the below URL
  4. Head to Home → App Templates, and the list of apps will show up
  5. Select the app you wish to deploy, fill in any config options, and hit Deploy

Template Import URL

https://raw.githubusercontent.com/Lissy93/portainer-templates/main/templates.json
Show Me demo
docker run -d --name sde \
  -p 443:443/tcp \
  -p 502:502/tcp \
  -p 1883:1883/tcp \
  -p 49321:49321/tcp \
  -v sde-volume:/opt \
  --restart=always \
  sorbotics/sorba-sde:latest

If the stack expects env vars, set them or add them to a .env file first.

services:
  sde:
    image: sorbotics/sorba-sde:latest
    container_name: my-sde
    cap_add:
      - NET_ADMIN
    restart: always
    volumes:
      - sde-volume:/opt
    ports:
      - 443:443/tcp
      - 502:502/tcp
      - 1883:1883/tcp
      - 49321:49321/tcp
    sysctls:
      - net.ipv4.ip_forward=1
    networks:
      - sorbotics

volumes:
  sde-volume:
    driver: local

networks:
  sorbotics:

Or, use the original compose file, straight from the template repo. Deploy with:

git clone https://github.com/portainer/templates
cd templates
docker compose -f edge/sorba-sde/docker-compose.yml up -d

Save this file as sorba-sde-stack.yml, then from a manager node, run docker stack deploy -c sorba-sde-stack.yml sorba-sde

version: '3.8'
services:
  sorba-sde:
    image: sorbotics/sorba-sde:latest
    ports:
      - 443:443/tcp
      - 502:502/tcp
      - 1883:1883/tcp
      - 49321:49321/tcp
    volumes:
      - sde-volume:/opt
    deploy:
      restart_policy:
        condition: any

Save each file below into a folder, then run kubectl apply -f .
Written for k3s, but works on any cluster: bind mounts use hostPath, named volumes get a persistent volume claim, and ports are exposed via a LoadBalancer service.

sorba-sde-deployment.yaml

apiVersion: apps/v1
kind: Deployment
metadata:
  name: sorba-sde
  labels:
    app: sorba-sde
spec:
  replicas: 1
  selector:
    matchLabels:
      app: sorba-sde
  template:
    metadata:
      labels:
        app: sorba-sde
    spec:
      containers:
        - name: sorba-sde
          image: sorbotics/sorba-sde:latest
          ports:
            - containerPort: 443
              protocol: TCP
            - containerPort: 502
              protocol: TCP
            - containerPort: 1883
              protocol: TCP
            - containerPort: 49321
              protocol: TCP
          volumeMounts:
            - name: sorba-sde-data-0
              mountPath: /opt
      volumes:
        - name: sorba-sde-data-0
          hostPath:
            path: sde-volume

sorba-sde-service.yaml

apiVersion: v1
kind: Service
metadata:
  name: sorba-sde
spec:
  type: LoadBalancer
  selector:
    app: sorba-sde
  ports:
    - name: 443-tcp
      port: 443
      targetPort: 443
      protocol: TCP
    - name: 502-tcp
      port: 502
      targetPort: 502
      protocol: TCP
    - name: 1883-tcp
      port: 1883
      targetPort: 1883
      protocol: TCP
    - name: 49321-tcp
      port: 49321
      targetPort: 49321
      protocol: TCP

Save this file as ~/.config/containers/systemd/sorba-sde.container

[Unit]
Description=SORBA SDE

[Container]
Image=sorbotics/sorba-sde:latest
ContainerName=sorba-sde
PublishPort=443:443/tcp
PublishPort=502:502/tcp
PublishPort=1883:1883/tcp
PublishPort=49321:49321/tcp
Volume=sde-volume:/opt

[Service]
Restart=always

[Install]
WantedBy=default.target

Then reload systemd and start the service:

systemctl --user daemon-reload
systemctl --user start sorba-sde

For a system-wide service, use /etc/containers/systemd/ and drop --user.

For more installation options, see the Documentation in our GitHub repo

Install SORBA Smart Data Engine in Docker

The SORBA Smart Data Engine (SDE) is an industrial data collection/gateway device capable of Advanced Edge Analytics & Machine Learning Edge Processing. SORBA-SDE is equipped with multiple communication driver/protocol applicable to the industrial market. The SORBA-SDE is a sensor/hardware agnostic device that serves as your point & click gateway capable of talking to multiple devices in real-time. The SDE provides easy access to equipment for troubleshooting and remote programming support for PLCs & HMIs utilizing a hassle-free easy, set-up approach to your assets.

Introduction

This document will help you install the SORBA SDE container in your environment (Windows, macOS, or Linux).
To get started, you will need:
  • A machine with at least 6 CPU cores (AMD64 architecture) and 16GB of RAM.
  • The latest version of Docker Engine or Docker Desktop installed and working.
  • Administrative access to the machine that will host your SORBA SDE instance.
  • By default, SORBA SDE will expose the UI over port 443 (HTTPS), port 502 (Modbus TCP) for the internal Modbus TCP Server, port 1883 (MQTT) for the internal MQTT Broker, and port 49321 for the OPC UA server. You can choose whether to expose these ports or not; the only required port mapping is 443.

Deployment

Create a volume to persist your SDE data:
docker volume create my-sde-data

Download and install the SORBA SDE container:
docker run -d -p 443:443 -p 502:502 -p 1883:1883 -p 49321:49321 --name my-sde -v my-sde-data:/opt --restart=always --cap-add=NET_ADMIN sorbotics/sorba-sde:latest

SORBA SDE has now been installed. You can check to see whether the SDE container has started by running docker ps:
root@server:~# docker ps
CONTAINER ID   IMAGE                 COMMAND                  CREATED          STATUS         PORTS                                                                                                                       NAMES
20538a4c0557   sorbotics/sorba-sde   "/usr/bin/supervisor…"   1 minute ago   Up 60 seconds   0.0.0.0:1883->1883/tcp, :::1883->1883/tcp, 0.0.0.0:443->443/tcp, :::443->443/tcp          my-sde

Deploy an SDE with docker compose

You may optionally define the SORBA SDE deployment from docker-compose.yml file
Create a file named docker-compose.yml and put the following content:
services:
  sde:
    image: sorbotics/sorba-sde:latest
    container_name: my-sde
    cap_add:
      - NET_ADMIN
    restart: always
    volumes:
      - sde-volume:/opt
      # - /path/to/your-own-renamed-certs:/etc/nginx/cert/
    ports:
      - 443:443/tcp
      - 502:502/tcp
      - 1883:1883/tcp
      - 49321:49321/tcp
    sysctls:
      - net.ipv4.ip_forward=1
    networks:
      - sorbotics

volumes:
  sde-volume:
    driver: local

networks:
  sorbotics:

Then execute the following command in the same path where you created the docker-compose.yml file:
docker compose up -d

Logging In

Now that the installation is complete, you can log into your SORBA SDE instance by opening a web browser and going to:
https://localhost

Replace localhost with the relevant IP address or FQDN if needed, and adjust the port if you changed mapped ports earlier.
You can use the following credentials to sign in SORBA SDE:
  • Username: admin
  • Password: adminpwd

Setting up custom port mapping

If your server is using default ports or you want to change the default ports mapped to your host, you can define your desired ports in the docker run ... command:
docker run -d -p 8443:443 -p 502:502 -p 1883:1883 -p 49321:49321 --name my-sde -v my-sde-data:/opt --restart=always --cap-add=NET_ADMIN sorbotics/sorba-sde:latest

If you run the command above you would navigate to https://localhost:8433 because 8443 represents the mapped port to your server host.
You can also change mapped ports for OPC UA and Modbus TCP but you will need to update your device configuration in your SDE.

Setting up custom volume mapping

You have the option to map a custom volume on the host system. Although the Dockerfile already defines a persistent directory managed by Docker through the VOLUME instruction, you can override this behavior by specifying a custom volume when launching the container.
You will need a volume with default information. To initialize a volume with default data, you can create a temporary container to extract the required default information from our SDE image:
docker create --name temp-sde-container sorbotics/sorba-sde:latest

Then copy the default data in /opt from your temporary container to your desired location in your local machine:
docker cp temp-sde-container:/opt /path/to/custom/volume

Delete your temp container once the data has been extracted:
docker rm -f temp-sde-container

Run your SDE with custom volume mapping:
docker run -d -p 443:443 -p 502:502 -p 1883:1883 -p 49321:49321 -v /path/to/custom/volume:/opt --name my-sde --restart=always --cap-add=NET_ADMIN sorbotics/sorba-sde:latest

Important

If you're running Docker on Windows, it is highly recommended to use Docker-managed volumes rather than bind mounts (e.g., ./path/to/volume:/opt). Bind mounts can lead to Poor performance and Unexpected behavior.

Setting up custom SSL certificates

Using docker run

If you don’t know the container name, list all running containers:
docker ps

Example output:
CONTAINER ID   IMAGE                                    COMMAND                  CREATED             STATUS             PORTS                                                                                                                                                                                                                 NAMES
cf7024f52313   sorbotics/sorba-sde:10.7.1               "/init.sh"               About an hour ago   Up About an hour   0.0.0.0:80->80/tcp, [::]:80->80/tcp, 0.0.0.0:443->443/tcp, [::]:443->443/tcp, 0.0.0.0:502->502/tcp, [::]:502->502/tcp, 0.0.0.0:1883->1883/tcp, [::]:1883->1883/tcp, 0.0.0.0:49321->49321/tcp, [::]:49321->49321/tcp   my-sde-custom-cert

  • Look for the container using the Sorba SDE image
  • The value under the NAMES column is the container name

In this guide, we will use: my-sde-custom-cert (Sorba SDE container)

Step 1: Prepare Certificate Files on the Host

Before copying files into the container, place your SSL certificate and key on the host machine.

Recommended directory:

/home/sdc/custom-certs/

Expected files:

  • client.crt → SSL certificate
  • client.key → Private key

Example:
/home/sdc/custom-certs/client.crt
/home/sdc/custom-certs/client.key

Notes:

  • Ensure files are valid and not corrupted
  • Permissions should allow Docker to read them:

chmod 664 /home/sdc/custom-certs/client.crt
chmod 664 /home/sdc/custom-certs/client.key

Step 2: Copy Certificate Files into the Sorba SDE Container

Use the following commands to copy the new certificate and private key into the container:
docker cp /home/sdc/custom-certs/client.crt my-sde-custom-cert:/opt/sdc/ssl/certs/sorbaai-ss-cert.crt

docker cp /home/sdc/custom-certs/client.key my-sde-custom-cert:/opt/sdc/ssl/certs/sorbaai-ss-key.key

Step 3: Restart NGINX Service

After updating the certificate files, restart the NGINX service inside the container:
docker exec my-sde-custom-cert supervisorctl restart http-server

Step 4: Verify the Changes

Option 1: Browser

  • Open your application using HTTPS
  • Check certificate details in the browser

Option 2: CLI

openssl s_client -connect <your-domain>:443

Troubleshooting

Certificates not applied

  • Verify file paths in NGINX configuration
  • Confirm files exist inside container:

docker exec -it my-sde-custom-cert ls -l /opt/sdc/ssl/certs/

Permission issues

docker exec -it my-sde-custom-cert chmod 644 /opt/sdc/ssl/certs/sorbaai-ss-cert.crt
docker exec -it my-sde-custom-cert chmod 644 /opt/sdc/ssl/certs/sorbaai-ss-key.key

Using docker compose

Prerequisites

  • Docker and Docker Compose installed (v2+ required for docker compose cp)
  • Access to the host server
  • SSL certificate files (.crt and .key)
  • The following Sorba SDE deployment:

services:
  sde:
    image: sorbotics/sorba-sde:latest
    container_name: my-sde-custom-cert
    cap_add:
      - NET_ADMIN
    restart: always
    volumes:
      - sde-volume:/opt
    ports:
      - 443:443/tcp
      - 502:502/tcp
      - 1883:1883/tcp
      - 49321:49321/tcp
    sysctls:
      - net.ipv4.ip_forward=1
    networks:
      - sorbotics

volumes:
  sde-volume:
    driver: local

networks:
  sorbotics:

Step 1: Deploy the Sorba SDE Container

Start the container:
docker compose up -d

Verify it is running:
docker compose ps

Step 2: Prepare Certificate Files on the Host

Place your certificate files on the host:
/home/sdc/custom-certs/client.crt
/home/sdc/custom-certs/client.key

Set correct permissions:
chmod 664 /home/sdc/custom-certs/client.crt
chmod 664 /home/sdc/custom-certs/client.key

Step 3: Copy Certificate Files into the Container

Copy the certificate and key into the SDE service container:
docker compose cp /home/sdc/custom-certs/client.crt sde:/opt/sdc/ssl/certs/sorbaai-ss-cert.crt

docker compose cp /home/sdc/custom-certs/client.key sde:/opt/sdc/ssl/certs/sorbaai-ss-key.key

Notes:

  • Destination path inside the container:

``` /opt/sdc/ssl/certs/ ```
  • File names must match NGINX configuration:

sorbaai-ss-cert.crt sorbaai-ss-key.key

Step 4: Restart NGINX Service

Apply the new certificates:
docker compose exec sde supervisorctl restart http-server

Step 5: Verify the Changes

Browser

  • Open your application via HTTPS
  • Check the certificate details

CLI

openssl s_client -connect <your-domain>:443

Troubleshooting

Verify files inside the container

docker compose exec sde ls -l /opt/sdc/ssl/certs/

Certificates not applied

  • Ensure files were copied successfully
  • Verify file names match NGINX configuration
  • Restart NGINX again

Check logs

docker compose logs sde

Fix permissions inside container

docker compose exec sde chmod 644 /opt/sdc/ssl/certs/sorbaai-ss-cert.crt
docker compose exec sde chmod 644 /opt/sdc/ssl/certs/sorbaai-ss-key.key

Update SDE to the Latest Docker Image

Depending on how you created the container, the update process will differ slightly. Below are instructions for both docker compose and docker run.

If using Docker Compose

To update your container to the latest version of the image:
docker compose pull
docker compose up -d --force-recreate

This will:
  • Pull the latest version of the image from the registry
  • Recreate the container with the updated image
  • Preserve volumes and environment variables

No manual cleanup is necessary; Docker Compose handles it for you.

If using docker run

Updating containers created with docker run requires a bit more care, especially when it comes to preserving data.
✅ Case 1: You used a named volume
If you previously created the container using a named volume, your data is safe and will persist across container recreations. You can reuse the same volume with the updated container (see "Recreate the Container with the Latest Image" below).
⚠️ Case 2: You used an anonymous volume
If the container was created without specifying a volume name, Docker assigned a random volume name, and the data will be lost when the container is removed.
To safely upgrade, follow these steps to migrate data to a new named volume:
  1. Create a new named volume:

docker volume create my-sde-data

  1. First, check the container name (if not already known):

docker ps

  1. Identify the anonymous volume used:

docker inspect my-sde --format "{{ range .Mounts }}{{ .Source }} => {{ .Destination }} {{ end }}"

Look for a volume with a long hash as the Source, something like:
/var/lib/docker/volumes/abc1234567890.../_data => /opt 

  1. Copy the data to the new volume using a temporary container:

docker run --rm -v abc1234567890:/from -v my-sde-data:/to alpine sh -c "cp -a /from/. /to/"

This command uses a lightweight alpine container to copy all files from the old volume (abc1234567890) to the new one (my-sde-data).

Recreate the Container with the Latest Image

  1. Pull the latest image:

docker pull sorbotics/sorba-sde:latest

  1. Stop and remove the old container:

docker stop my-sde
docker rm my-sde

⚠️ This only removes the container and anonymous volumes, but named volumes will persist.
  1. Recreate the container using the named volume:

Make sure to reuse the same volume names:
docker run -d -p 443:443 -p 502:502 -p 1883:1883 -p 49321:49321 --name my-sde -v my-sde-data:/opt --restart=always --cap-add=NET_ADMIN sorbotics/sorba-sde:latest

Setting a Static MAC Address (Required for Licensed Environments)

If you plan to use a licensed version of SORBA SDE, it’s required to assign a static MAC address to the container. This is because the licensing mechanism is tied to both a persistent MAC address and a serial number.
By default, Docker assigns a random MAC address every time the container is recreated unless you explicitly define it.
To ensure the MAC address remains consistent:

Option 1: If you're using docker run ...

If you originally deployed SORBA SDE using a docker run command, you'll need to:
  1. Stop the current container: docker stop my-sde
  2. Remove the old container: docker rm my-sde (this does not delete your data if you used a named volume).
  3. Recreate the container using the --mac-address flag.

As long as you reuse the same volume (e.g., -v my-sde-data:/opt), your data will remain intact.

docker run -d \
  --mac-address=XX:XX:XX:XX:XX:XX \
  -p 443:443 -p 502:502 -p 1883:1883 -p 49321:49321 \
  --name my-sde \
  -v my-sde-data:/opt \
  --restart=always \
  --cap-add=NET_ADMIN \
  sorbotics/sorba-sde:latest

Replace XX:XX:XX:XX:XX:XX with your desired MAC address. It must be a valid, unique address in your network.

Option 2: If you're using Docker Compose

If you are using docker-compose.yml, simply add the mac_address field to the service definition:
services:
  sde:
    image: sorbotics/sorba-sde:latest
    container_name: my-sde
    mac_address: XX:XX:XX:XX:XX:XX
    cap_add:
      - NET_ADMIN
    restart: always
    volumes:
      - sde-volume:/opt
      # - /path/to/your-own-renamed-certs:/etc/nginx/cert/
    ports:
      - 443:443/tcp
      - 502:502/tcp
      - 1883:1883/tcp
      - 49321:49321/tcp
    sysctls:
      - net.ipv4.ip_forward=1
    networks:
      - sorbotics

volumes:
  sde-volume:
    driver: local

networks:
  sorbotics:
    driver: bridge

Then apply the changes:
docker compose up -d sde --force-recreate

Important Notes

  • The static MAC address will be used to generate and validate your license.
  • If the MAC address changes, your license will be invalidated.
  • The MAC address must be unique and valid within your network.
  • Always ensure the same MAC is used if the container is stopped, updated, or recreated.
  • Reusing the same named volume (-v my-sde-data:/opt) guarantees your data is preserved.

Troubleshooting

  1. Unable to pull image from Docker Hub (401 Unauthorized)

If you see an error like:
failed to authorize: failed to fetch oauth token: 401 Unauthorized

The image is public, so authentication is not required.
However, if you're logged in with an invalid or unverified Docker Hub account, you might still get this error.
Try one of the following:
# Option 1: Verify your Docker Hub account
# Option 2: Log out to pull as anonymous
docker logout

  1. Unable to Log In Using Default Credentials

Problem: After running the SDE container, you are unable to log in using the default credentials.
Solution:
  • Ensure your machine has enough resources (CPU, RAM, and disk space).
  • Check the container logs to confirm that the SDE container has initialized successfully:

root@server:~# docker logs -f my-sde
Initializing SDE...
Waiting for services...
SDE Initialized!
/usr/bin/supervisord -ns >> /dev/null 2>&1

Serve SORBA SDE on your own domain behind Caddy, Nginx or Traefik. Fill in your domain and copy the result. It's a starting point, some apps need their own base URL or extra headers set too.

Proxying sorba-sde.example.com to https://sde:443

Add this to your Caddyfile

sorba-sde.example.com {
	reverse_proxy https://sde:443 {
		transport http {
			tls_insecure_skip_verify
		}
	}
}

Check the logs first

Nine times out of ten the logs tell you exactly what went wrong.

  • In Portainer, go to Containers, click the container, then Logs. Or run docker logs <container>
  • Exit codes help too: 137 means killed, usually out of memory. 126 or 127 means the command inside the image is broken.

Port already in use

If deployment fails with "Bind for 0.0.0.0:443 failed: port is already allocated", something else on your server is using that port.

  • Find what's using it: sudo ss -tlnp | grep :443
  • Stop the other service, or pick a different host port. In 443:443 only the left number is yours to change, the right one belongs to the app.

Running but the page won't load

The container is up but nothing appears in your browser.

  • Use your server's real IP: https://your-server-ip:443. The 0.0.0.0 link Portainer shows isn't a real address.
  • Give it a minute after first deploy, sde can take a while to initialise.
  • Make sure your firewall allows the port, e.g. sudo ufw allow 443

Image won't pull

Test the pull directly on the host: docker pull sorbotics/sorba-sde:latest

  • "manifest unknown" means the tag no longer exists. This template uses latest, so try pinning a specific version instead.
  • "toomanyrequests" is the Docker Hub rate limit. Log in with docker login to raise it.
  • "no space left on device" means a full disk. Reclaim space with docker system prune

"exec format error"

This means the image was built for a different CPU architecture than your server.

  • This image supports: amd64
  • Check yours with uname -m: x86_64 is amd64, aarch64 is arm64. Raspberry Pi and other ARM boards are the usual culprits.

Container keeps restarting

The always restart policy relaunches the app after every crash, so the real error can scroll past.

  • Check the logs right after a restart, the last few lines before it died are the useful ones.
  • Get the exit code with docker inspect <container> --format '{{.State.ExitCode}}'
  • Still stuck? Redeploy once with the restart policy set to no so the failure stays visible.

Stack won't deploy

Compose stacks fail fast on small mistakes, and Portainer shows the reason just above the editor.

  • YAML only accepts spaces for indentation, a single tab breaks the whole file.

Raise an issue

Found something which isn't working as it should? Here's how to report it.

Similar apps