
![Nginx]() Nginx
Nginx
Container
High performance web server
Image details
Configuration
TypeContainerlinuxnginx:latest80/tcp443/tcp/etc/nginx/usr/share/nginx/htmlTemplate by portainer
Report issueStandalone Install
Select an install method, to see config/commands for deploying Nginx
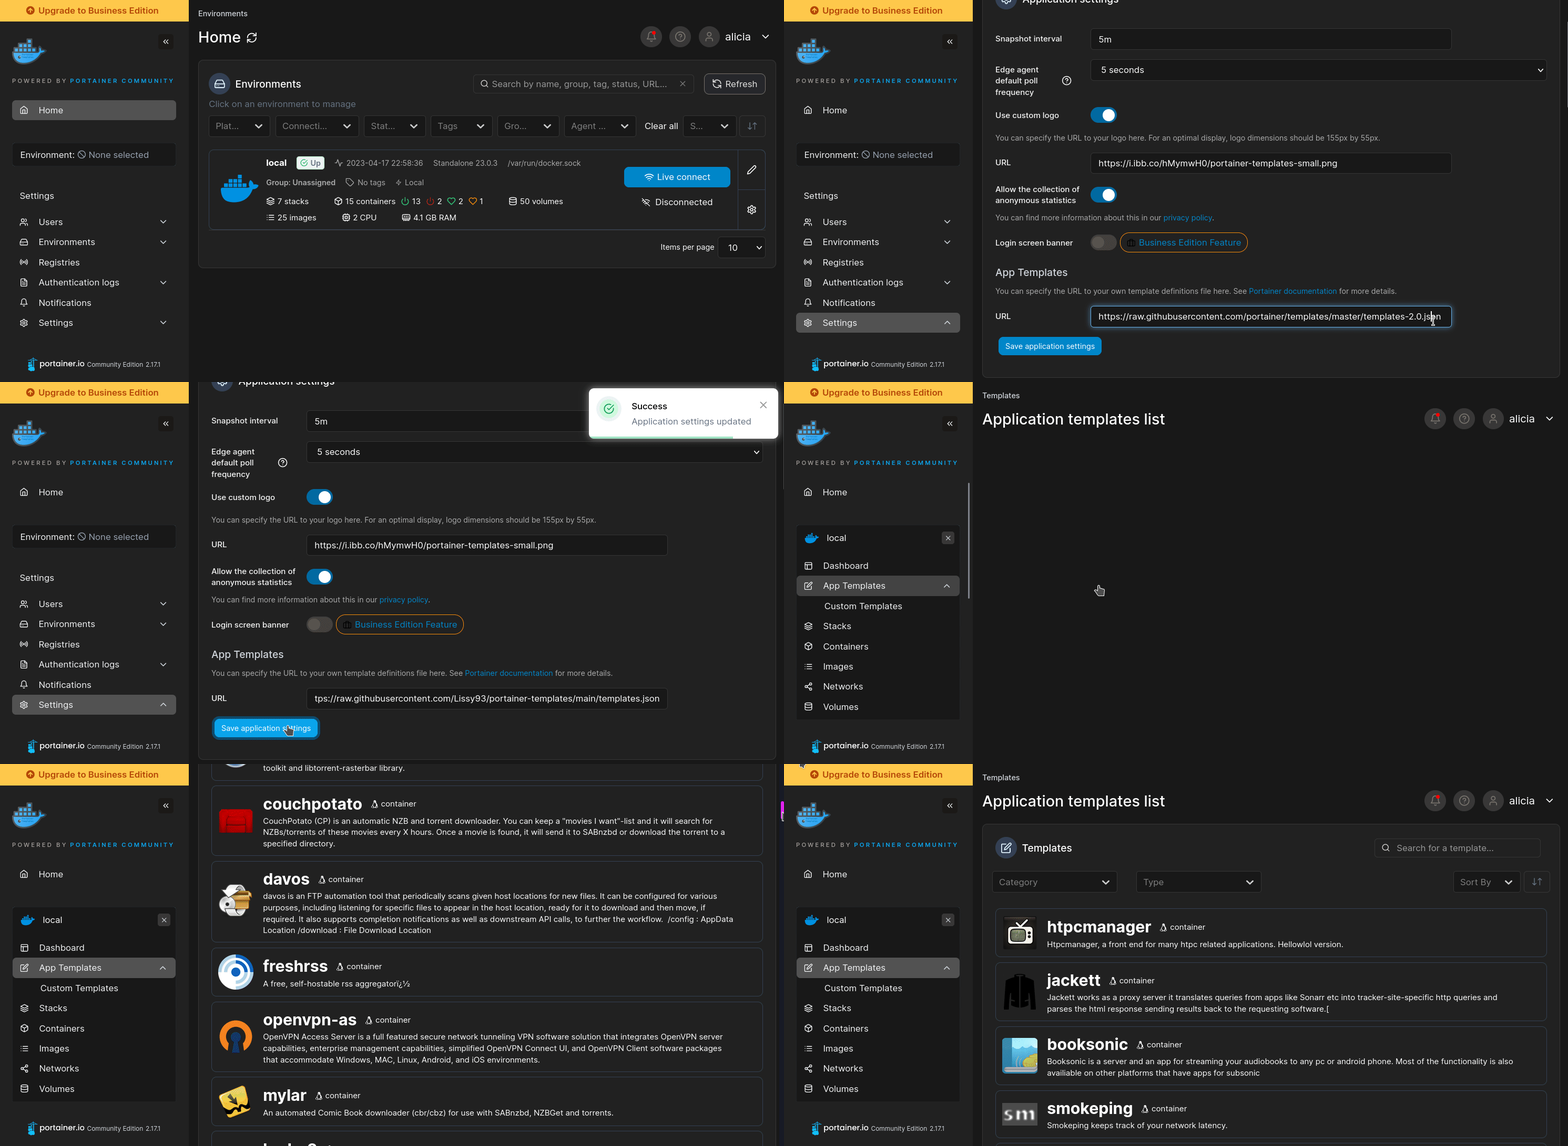
Install on Portainer
Import all app templates into your Portainer instance, for easy 1-click deploys
- Ensure both Docker and Portainer are installed, and up-to-date
- Log into your Portainer web UI
- Under Settings → App Templates, paste the below URL
- Head to Home → App Templates, and the list of apps will show up
- Select Nginx, fill in any config options, and hit Deploy
Template Import URL
https://raw.githubusercontent.com/Lissy93/portainer-templates/main/templates.json
Show Me
More install options in our documentation.
Quick reference
- Maintained by:
[the NGINX Docker Maintainers](https://github.com/nginx/docker-nginx)- Where to get help:
[the Docker Community Slack](https://dockr.ly/comm-slack), [Server Fault](https://serverfault.com/help/on-topic), [Unix & Linux](https://unix.stackexchange.com/help/on-topic), or [Stack Overflow](https://stackoverflow.com/help/on-topic)Supported tags and respective Dockerfile links
Quick reference (cont.)
- Where to file issues:
[https://github.com/nginx/docker-nginx/issues](https://github.com/nginx/docker-nginx/issues?q=is:issue+is:pr)- Supported architectures: (more info)
[`amd64`](https://hub.docker.com/r/amd64/nginx/), [`arm32v5`](https://hub.docker.com/r/arm32v5/nginx/), [`arm32v6`](https://hub.docker.com/r/arm32v6/nginx/), [`arm32v7`](https://hub.docker.com/r/arm32v7/nginx/), [`arm64v8`](https://hub.docker.com/r/arm64v8/nginx/), [`i386`](https://hub.docker.com/r/i386/nginx/), [`ppc64le`](https://hub.docker.com/r/ppc64le/nginx/), [`riscv64`](https://hub.docker.com/r/riscv64/nginx/), [`s390x`](https://hub.docker.com/r/s390x/nginx/)- Published image artifact details:
[repo-info repo's `repos/nginx/` directory](https://github.com/docker-library/repo-info/blob/master/repos/nginx) ([history](https://github.com/docker-library/repo-info/commits/master/repos/nginx))
(image metadata, transfer size, etc)- Image updates:
[official-images repo's `library/nginx` label](https://github.com/docker-library/official-images/issues?q=label%3Alibrary%2Fnginx)
[official-images repo's `library/nginx` file](https://github.com/docker-library/official-images/blob/master/library/nginx) ([history](https://github.com/docker-library/official-images/commits/master/library/nginx))- Source of this description:
[docs repo's `nginx/` directory](https://github.com/docker-library/docs/tree/master/nginx) ([history](https://github.com/docker-library/docs/commits/master/nginx))What is nginx?
Nginx (pronounced "engine-x") is an open source reverse proxy server for HTTP, HTTPS, SMTP, POP3, and IMAP protocols, as well as a load balancer, HTTP cache, and a web server (origin server). The nginx project started with a strong focus on high concurrency, high performance and low memory usage. It is licensed under the 2-clause BSD-like license and it runs on Linux, BSD variants, Mac OS X, Solaris, AIX, HP-UX, as well as on other nix flavors. It also has a proof of concept port for Microsoft Windows.wikipedia.org/wiki/Nginx

How to use this image
Hosting some simple static content
$ docker run --name some-nginx -v /some/content:/usr/share/nginx/html:ro -d nginxAlternatively, a simple
Dockerfile can be used to generate a new image that includes the necessary content (which is a much cleaner solution than the bind mount above):FROM nginx
COPY static-html-directory /usr/share/nginx/htmlPlace this file in the same directory as your directory of content ("static-html-directory"), then run these commands to build and start your container:
$ docker build -t some-content-nginx .
$ docker run --name some-nginx -d some-content-nginx
Exposing external port
$ docker run --name some-nginx -d -p 8080:80 some-content-nginxThen you can hit
http://localhost:8080 or http://host-ip:8080 in your browser.Customize configuration
You can mount your configuration file, or build a new image with it.If you wish to adapt the default configuration, use something like the following to get it from a running nginx container:
$ docker run --rm --entrypoint=cat nginx /etc/nginx/nginx.conf > /host/path/nginx.confAnd then edit
/host/path/nginx.conf in your host file system.For information on the syntax of the nginx configuration files, see the official documentation (specifically the Beginner's Guide).
Mount your configuration file
$ docker run --name my-custom-nginx-container -v /host/path/nginx.conf:/etc/nginx/nginx.conf:ro -d nginxBuild a new image with your configuration file
FROM nginx
COPY nginx.conf /etc/nginx/nginx.conf
If you add a custom
CMD in the Dockerfile, be sure to include -g daemon off; in the CMD in order for nginx to stay in the foreground, so that Docker can track the process properly (otherwise your container will stop immediately after starting)!Then build the image with
docker build -t custom-nginx . and run it as follows:$ docker run --name my-custom-nginx-container -d custom-nginxUsing environment variables in nginx configuration (new in 1.19)
Out-of-the-box, nginx doesn't support environment variables inside most configuration blocks. But this image has a function, which will extract environment variables before nginx starts.Here is an example using
compose.yaml:web:
image: nginx
volumes:
- ./templates:/etc/nginx/templates
ports:
- "8080:80"
environment:
- NGINX_HOST=foobar.com
- NGINX_PORT=80By default, this function reads template files in
/etc/nginx/templates/*.template and outputs the result of executing envsubst to /etc/nginx/conf.d.So if you place
templates/default.conf.template file, which contains variable references like this:listen ${NGINX_PORT};/etc/nginx/conf.d/default.conf like this:listen 80;NGINX_ENVSUBST_TEMPLATE_DIR
-	A directory which contains template files (default: `/etc/nginx/templates`)
-	When this directory doesn't exist, this function will do nothing about template processing.
NGINX_ENVSUBST_TEMPLATE_SUFFIX
-	A suffix of template files (default: `.template`)
-	This function only processes the files whose name ends with this suffix.
NGINX_ENVSUBST_OUTPUT_DIR
-	A directory where the result of executing envsubst is output (default: `/etc/nginx/conf.d`)
-	The output filename is the template filename with the suffix removed.
	-	ex.) `/etc/nginx/templates/default.conf.template` will be output with the filename `/etc/nginx/conf.d/default.conf`.
-	This directory must be writable by the user running a container.
NGINX_ENVSUBST_FILTER
-	A regular expression to filter environment variable names passed to `envsubst` (default: empty string)
-	When set, only variables whose names match this pattern are available for substitution.
Running nginx in read-only mode
To run nginx in read-only mode, you will need to mount a Docker volume to every location where nginx writes information. The default nginx configuration requires write access to/var/cache/nginx and /var/run. This can be easily accomplished by running nginx as follows:$ docker run -d -p 80:80 --read-only -v $(pwd)/nginx-cache:/var/cache/nginx -v $(pwd)/nginx-pid:/var/run nginxIf you have a more advanced configuration that requires nginx to write to other locations, simply add more volume mounts to those locations.
Running nginx in debug mode
Images since version 1.9.8 come withnginx-debug binary that produces verbose output when using higher log levels. It can be used with simple CMD substitution:$ docker run --name my-nginx -v /host/path/nginx.conf:/etc/nginx/nginx.conf:ro -d nginx nginx-debug -g 'daemon off;'Similar configuration in
compose.yaml may look like this:web:
image: nginx
volumes:
- ./nginx.conf:/etc/nginx/nginx.conf:ro
command: [nginx-debug, '-g', 'daemon off;']Entrypoint quiet logs
Since version 1.19.0, a verbose entrypoint was added. It provides information on what's happening during container startup. You can silence this output by setting environment variableNGINX_ENTRYPOINT_QUIET_LOGS:$ docker run -d -e NGINX_ENTRYPOINT_QUIET_LOGS=1 nginxUser and group id
Since 1.17.0, both alpine- and debian-based images variants use the same user and group ids to drop the privileges for worker processes:$ id
uid=101(nginx) gid=101(nginx) groups=101(nginx)Running nginx as a non-root user
It is possible to run the image as a less privileged arbitrary UID/GID. This, however, requires modification of nginx configuration to use directories writeable by that specific UID/GID pair:$ docker run -d -v $PWD/nginx.conf:/etc/nginx/nginx.conf nginxwhere nginx.conf in the current directory should have the following directives re-defined:
pid /tmp/nginx.pid;And in the http context:
http {
    client_body_temp_path /tmp/client_temp;
    proxy_temp_path       /tmp/proxy_temp_path;
    fastcgi_temp_path     /tmp/fastcgi_temp;
    uwsgi_temp_path       /tmp/uwsgi_temp;
    scgi_temp_path        /tmp/scgi_temp;
...
}
Alternatively, check out the official Docker NGINX unprivileged image.
Image Variants
Thenginx images come in many flavors, each designed for a specific use case.nginx:<version>
This is the defacto image. If you are unsure about what your needs are, you probably want to use this one. It is designed to be used both as a throw away container (mount your source code and start the container to start your app), as well as the base to build other images off of.Some of these tags may have names like trixie in them. These are the suite code names for releases of Debian and indicate which release the image is based on. If your image needs to install any additional packages beyond what comes with the image, you'll likely want to specify one of these explicitly to minimize breakage when there are new releases of Debian.
nginx:<version>-perl / nginx:<version>-alpine-perl
Starting with nginx:1.13.0 / mainline and nginx:1.12.0 / stable, the perl module has been removed from the default images. A separate -perl tag variant is available if you wish to use the perl module.nginx:<version>-alpine
This image is based on the popular Alpine Linux project, available in the alpine official image. Alpine Linux is much smaller than most distribution base images (~5MB), and thus leads to much slimmer images in general.This variant is useful when final image size being as small as possible is your primary concern. The main caveat to note is that it does use musl libc instead of glibc and friends, so software will often run into issues depending on the depth of their libc requirements/assumptions. See this Hacker News comment thread for more discussion of the issues that might arise and some pro/con comparisons of using Alpine-based images.
To minimize image size, it's uncommon for additional related tools (such as
git or bash) to be included in Alpine-based images. Using this image as a base, add the things you need in your own Dockerfile (see the alpine image description for examples of how to install packages if you are unfamiliar).nginx:<version>-slim
This image does not contain the common packages contained in the default tag and only contains the minimal packages needed to run nginx. Unless you are working in an environment where only the nginx image will be deployed and you have space constraints, we highly recommend using the default image of this repository.License
View license information for the software contained in this image.As with all Docker images, these likely also contain other software which may be under other licenses (such as Bash, etc from the base distribution, along with any direct or indirect dependencies of the primary software being contained).
Some additional license information which was able to be auto-detected might be found in the
repo-info repository's nginx/ directory.As for any pre-built image usage, it is the image user's responsibility to ensure that any use of this image complies with any relevant licenses for all software contained within.
Serve Nginx on your own domain behind Caddy, Nginx or Traefik. Fill in your domain and copy the result. It's a starting point, some apps need their own base URL or extra headers set too.
Proxying nginx.example.com to http://nginx:80
Add this to your Caddyfile
nginx.example.com {
	reverse_proxy http://nginx:80
}Check the logs first
Nine times out of ten the logs tell you exactly what went wrong.
- In Portainer, go to Containers, click the container, then Logs. Or run
docker logs <container> - Exit codes help too:
137means killed, usually out of memory.126or127means the command inside the image is broken.
Published on a random port
This template exposes 80/tcp without setting a host port,
so Docker picks a random free one on every deploy.
- Find it in the Ports column of Portainer's container list, or with
docker port <container>
Image won't pull
Test the pull directly on the host: docker pull nginx:latest
- "manifest unknown" means the tag no longer exists. This template uses
latest, so try pinning a specific version instead. - "toomanyrequests" is the Docker Hub rate limit. Log in with
docker loginto raise it. - "no space left on device" means a full disk. Reclaim space with
docker system prune
"exec format error"
This means the image was built for a different CPU architecture than your server.
- This image supports:
amd64, arm/v7, arm/v6, 386, ppc64le, s390x, riscv64, arm/v5, arm64/v8 - Check yours with
uname -m: x86_64 is amd64, aarch64 is arm64. Raspberry Pi and other ARM boards are the usual culprits.
Raise an issue
Found something which isn't working as it should? Here's how to report it.
- Bug within the app: Open an issue within the app's repo
- Template not working: Open an issue on portainer/templates
- This website not working: Open an issue on lissy93/portainer-templates
A single container
Nginx runs as one container, the simplest kind of app here. Just the one image to pull and nothing else wired up alongside it.
The app image
An image is the app packed up ready to go, everything Nginx needs bundled into one download. This template pulls nginx:latest, which Docker fetches once (about 35 MB) and then starts your own copy from.
Where the image comes from
Docker pulls its images from registries, public libraries of ready-built apps. Nginx's comes from Docker Hub as one of its official, curated images.
Version tags
The bit after the colon in the image name is the version tag. Here it's latest, which always points at the newest build, so a redeploy can bump you to a newer release without you asking. Newest right now is 1.31.6-alpine3.24-perl. Pin a specific tag if you would rather stay on one version.
Which machines it runs on
Every image is built for particular CPU types. This one ships for amd64, arm/v7, arm/v6, 386, ppc64le, s390x, riscv64, arm/v5, arm64/v8, so it runs on both regular x86 servers and ARM boards like a Raspberry Pi.
Ports
A port is the door the app answers on. Here the app exposes a port but leaves the host side blank, so Docker picks a free one for you. It opens:
80, published on a random host port443, published on a random host port
Volumes
A volume is where Nginx keeps its files so they survive an update or a restart. Without one, anything it saves would sit inside the container and vanish the moment it's recreated. This template mounts:
/etc/nginxas a volume Docker manages for you/usr/share/nginx/htmlas a volume Docker manages for you
Networking
Nothing custom is set, so Nginx sits on Docker's default bridge network: its own private space that reaches the outside world only through the ports it publishes.
Platform
The platform is linux, the kind of system the container is built to run on. Docker and Portainer handle this on a normal Linux server.
Portainer app templates
Zooming out, this whole page comes from a Portainer app template: a short recipe telling Portainer how to set Nginx up. Add the template list to Portainer once, then deploying Nginx is a click rather than a wall of config.